Fly Fishing Traditions


Fly Fishing Traditions Blog and Website
"It's about Life & Fly Fishing"

Wednesday, July 30, 2014

Top 10 Habits for Success on Stillwaters

Phil Rowley is a strong proponent of being prepared when fishing stillwaters. This means having consistent and good habits. This also means having your equipment in order, knowing the entomology and locomotion of the bugs you will find in stillwaters and maintaining good and positive energy.

Here is a summary of Phil's Top 10 Habits for Success on Stillwaters. I was introduced to his top 10 Habits at a "Stillwater School" he put together in Idaho. If you every get a chance to attend one of Phil's Stillwater Schools or Seminars you won't be sorry. You can check out Phil's website at www.flycraftangling.com for lots of tips on fishing stillwaters or check out his schedule of events for schools and seminars.


(1) Equipment - Everyone should purchase a good kit bag and stock it with all the essentials for stillwaters. Dedicate this bag to stillwaters and don't try to have one bag cover both streams and stillwaters. Use two rods and carry multiple lines. Here's some of the equipment you will need to add to your stash.


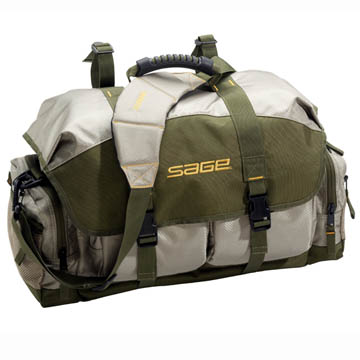
  • Kit Bag - Maintain a well equipped Stillwater bag and restock as soon as possible. Sage makes a good one. You can also check out Fishpond and Cabelas. Just make sure its big enough and if possible water proof or at least water resistant.
  • Rods - Always rigg two Rods. I'd recommend a 9'6" or 10' six weight and a 9'0 or 9'6" 5 weight. The longer the better. Of coarse, the size of the fish you are searching for may dictate other choices.
  • Lines - A well prepared stillwater angler should carry a Floating, Intermediate, Clear Camo, Outbound Hover, Sinking Type III through Type VII. If in a pinch for sinking lines, you can get by with two full sink lines. Carry a Type III and a Type V or Type VII.
  • Sunglasses- Always wear polarized glasses. You can see through the water and they add a level of safety. Who wants to get a fly stuck in their eye?
  • Watercraft - You can set up a Pram, Pontoon Boat or Belly Boat for fishing stillwaters. Make your choice, portability, budget and comfort all are factors, they all work.
  • Notepad - Keep a notepad in your kit bag. You can get waterproof ones from a surveyor's supply store. They use them for doing their outdoor surveying work.
  • Extra Nippers and Forceps - Always carry extra nippers and forceps. You never know what can get loose when you're fishing in a body of water.
  • Indicators - Carry Slip Indicators, Corkie Indicators, and yarn indicators in different sizes. You may need them all in different conditions.
  • Split Shot and Swivels - Carry an assortment of split shot and swivels for rigging your slip indicators.
  • Floatant and Desiccant - Carry your favorite floatant and Desiccant to keep your dries and emergers where you want them. Learn how to apply them properly.
  • Sunscreen and Insect Repellent - Can't do without it!
  • Tylenol, Advil and Benedryl - Carry a bag with these items. You never know when you or a friend my need them.

(2) Electronics


  • Fish Finder - The most common fish finder is the Hummingbird Fishin Buddy. The model 120 has side finding ability and with a black and white display runs about $160. Make sure you know all the features of your fish finder and which are applicable to your fishing methods.
  • GPS - More and more people are using GPS systems to mark shoals and productive areas of the stillwaters that they fish. Mark it. Find it Later.
(3) Observation - Keep your eyes and ears open and watch what mother nature is telling you.


  • Research and Obtain Local Knowledge - Use the web or call local fly shops to get as much recent information so you are prepared. Talk to fellow anglers.
  • Make Notes of Weather Conditions - Water Temperature and Clarity - The water temperature can tell you how active bugs may be or where they may be located. The clarity can dictate the way and length that you rigg your leader.
  • Examine Shoreline Vegetation - There are almost always bugs hanging out along the shoreline. You can get a good idea of the bug life and what stages are present by being a shoreline detective.
  • Check out Spider Webs - Spiders catch and eat stillwater bugs. You can see what they've been eating and can then get a good idea of what has been hatching.
  • Turn over Rocks and Logs - You can often find bugs hiding amongst the weeds, rocks and under submerged logs. Leeches are often found hiding in shoreline vegetation. You can get an idea of their size and coloration.
  • Take notice of Bird Activity - As we know when fishing rivers and streams, birds buzzing the water signify that something is hatching. This can also happen on stillwaters and can give you a clue as to where to fish in a larger lake. Bugs sometimes emerge and hatch in certain areas of lakes and the birds are a good indicator of where a hatch may be happening.
  • Check out Surrounding Topography - The surrounding topography can give clues to the depth and topography of the lake's structure. For instance a steep slope entering a lake will typically mean the water in that area continues to gain depth quickly with little shoal area. A flat shoreline will typically indicate shallower depths and shoal areas nearby.
  • Study the Water's Surface - Look for bugs on the water. Use an aquarium net to catch them. Look for rise rings and rise forms. Do you see callibaetis struggling to hatch? Are there blue damselflies buzzing around. Are the rise forms showing a bubble, which means they are taking duns or is there a bulge with a dorsal fin and then a tail, which is an emerger rise. Determine if the fish are feeding on top or just below the surface.
  • Look Into The Water. Look for weed beds, shoals and drop- offs. How clear is the water? Are there any bugs swimming around? Damselflies swimming to shore or structure? Do you see fish? What Depth?
  • Pay Attention for Shucks - For instance, look for the shucks of callibaetis mayflies and chironomids that may have recently hatched.
  • Observe Other Anglers - You should pay attention to who's catching fish and where they are fishing. You may be able to determine what method they are using or what type of retrieve.
  • Make Notes and Maintain a Diary - One of the best things you can do if you want to become a better fisherman is to take notes or maintain a diary every time you get out fishing. Record the weather conditions, water temperatures, flies and methods used. What worked as well as what didn't. Record anything that may help you at a later date.
(4) Water Conditions - The wind, weather and water conditions (Temperature and Clarity) affect decisions when on stillwaters.

  • Water Conditions affect the choice of;
(a) Retrieve method
(b) Line Choice
(c) Pattern Selection
(d) Presentation depth
  • Water Temperatures Affect the;
(a) Fish and Invertebrate Activity
(b) Location of Fish
(c) Retrieve Speed

(5) Approach


  • Stealth is Always the Key - Always maintain as much stealth as possible when fishing. Be methodical and don't hurry.
  • Lower Anchors Gently - Don't make a big splash when you drop the anchor and they enter the water. Fish don't like grenades.
  • Keep Noise to a Minimum - Especially when fishing out of a boat or a pram. When using a kick boat or pontoon boat, kick silently and don't splash when kicking.
  • Use Carpeting - If fishing from a boat or pram cover the bottoms with carpet or other noise dampening materials.
  • Approach - Approach from the deep water when setting up to fish an area.
  • Move About Silently - Drift, row, kick or use an electric motor. Don't use an outboard motor to survey the lakes topography or to move into your fishing position. Shut off the motor and glide into position.
  • Stretch your Line and Leaders to Remove Memory. Fly lines with coils in them will not fish properly or allow you to keep a more direct contact to your flies. Take the time to stretch out your fly lines and leaders.
  • Use a Correct Rod Position - Keep your tip in the water. For the most part your rod tip should always be in the water up to 2 or 3 guides. This keeps you in direct contact and enables you to make consistent retrieves.
  • Strip out slack once your cast has landed - Keep contact with your flies as soon as they land. Strip in excess line instead of re-casting. When using intermediate and sinking lines fish will often take your fly as it sinks. If you don't keep tight to your flies you will not detect the take.
  • Make straight line presentations - A straight line cast shot above the water and then allowed to straighten out and fall to the water is the best way to keep in contact with your flies as soon as they hit the water. It is also the most stealthy presentation.
  • Don't water load your casts - When wanting to maintain stealth, using water load casts is like throwing rocks into the area you want to fish. Learn to keep your line in the air and minimize the false casts.
  • Use your watch to countdown retrieves - Know your sinking lines sink rates and what depth you want to fish. Calculate the rate of sink, times the desired depth to get the time the line needs to sink. Use your watch to time the sink. Be patient and wait. You can jig the line as it sinks to get the fly moving and stay in contact. A fish may take it on the way down.
  • Slow down your retrieves - Fish your flies slower than you might think. When you think you're going slow, go slower. This is when you are using imitative retrieves that match the locomotion of the natural.
  • Watch Your Line - If using a floating line watch the tip where it enters the water. Keep an eye for subtle movement, set when it moves. If you don't set, you'll never know if it was a fish.
  • Fish the hang when retrieving - How many times does a fish take right as you lift the rod to re-cast. Fish your flies right to the end. Pay attention when you pick up to recast. Let the flies hang for a bit, lift and hopefully a fish will have been following and will take right at the end.
(6) Droppers and Loop Knots


  • Fly Selection - Vary the sizes and colors of your flies when using droppers, especially when you are searching.
  • Dry Dropper - Suggest different stages of the bug you are imitating by using a dry dropper. Use a dry, emerger or cripple on the surface or in the film and use an imitative nymph as a trailer.
  • Droppers When its Windy - Using droppers add weight in windy conditions.
  • Cover Different Depths - Droppers cover different depths, You can rigg two or more nymphs when fishing a slip indicator to cover different depths.
  • Use an Attractor on the Point - Using a flashy or larger attractor pattern can draw the fish's attention to your more imitative flies trailing.
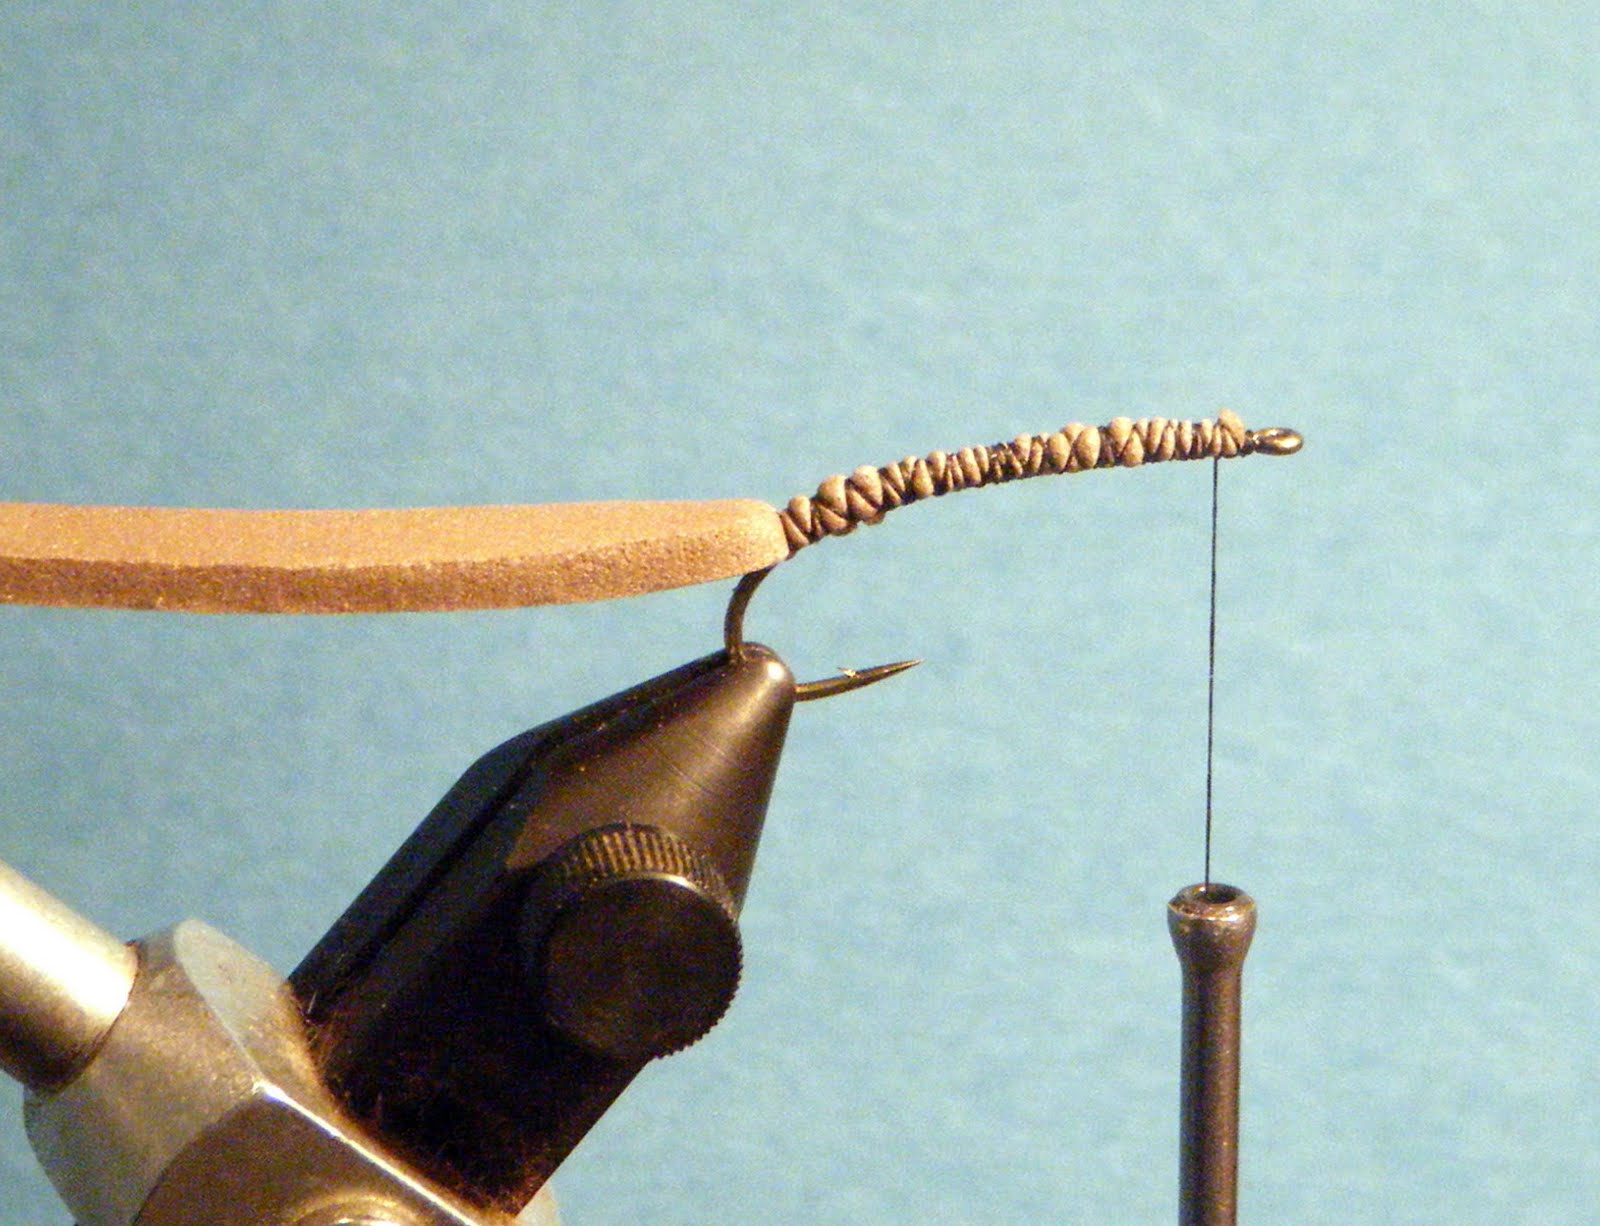
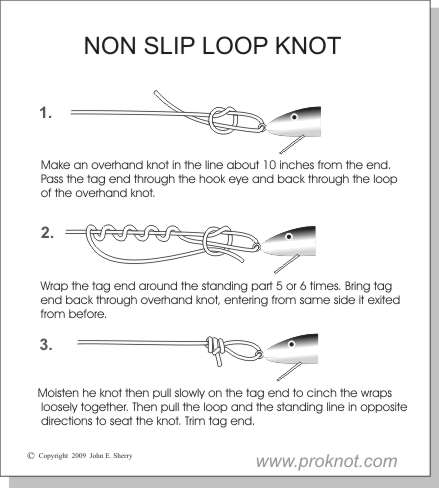
  • Non Slip Mono Loop - Use a non-slip knot to attach all your flies. It is a strong knot and simple to tie. It allows your flies to be presented in a lifelike manner with the open loop.
(7) Entomology and Throat Pump


  • Do your Homework - Study to have a basic understanding of all key stillwater food sources.
  • Locomotion - Study the locomotion of all key stillwater food sources so you can develop retrieve techniques to match them.
  • Emergence - Study and learn emergence behavior. What time of year do they emerge? What time of day? How does the weather affect their emergence?
  • Seasonal Availability - Learn the seasonal availability of all the key stillwater food sources. In the spring what bugs are available to the trout? What about summer and fall?
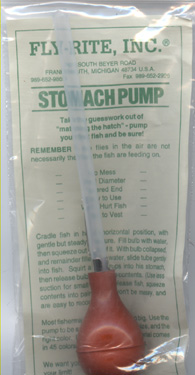
  • Throat Pump - Learn to use a throat pump properly and remember that the welfare of the trout is paramount. When you purchase a "Throat Pump" they are usually called "Stomach Pumps". Do we want to pump the contents of the trout's stomach? No! When properly using a throat pump, only sample what is in the trout's throat. That's what they are currently eating anyway.
(a) Using a throat pump will identify the food sources the trout is currently feeding on.

(b) Using a throat pump will help determine if the fish was actively feeding or just happened upon your fly.

(c) Using a throat pump can help determine the feeding location within the water column by the type of invertebrates in its throat.

(8) Versatility
  • Don't get Static - Avoid one dimensional line or presentation techniques. If one thing isn't working change. Change depths, change retrieves, change lines, change flies, change locations. Get it?
  • Lines - Learn how to use every line in your arsenal. Learn each lines sink rates and how they relate to getting to the desired depth to be fished. Count the lines down. Use your watch.
  • Double Anchors - Always use double anchors when fishing out of a boat, pram or pontoon boat. This will allow you to present your flies in a controlled manner.
  • Drogues - Learn how to use drogues (water socks) when drifting in the wind and presenting flies. This will help control the speed you are drifting.
  • Retrieves - Know all the different retrieves as they relate to your prey. Vary your retrieves and pattern of the retrieves.
  • Imitative and Attractive Retrieves - Learn and use both imitative and attractive retrieve techniques. Learn how the various retrieves relate to the locomotion of the invertebrate you are imitating.
  • Move - Move often to cover water
(9) Patience
  • Patience - Patience is a virtue that all fisherman must develop.
  • Patience - Allow your lines and flies to sink to the correct depth. Count them down.
  • Patience - Use your watch for accurate sink times
  • Patience - Know the sink rates of all your lines and present then correctly
(10) Attitude & Belief
  • Fish with "Quiet Confidence"
  • "PFA" - Always show up to fish with "PFA", Positive Fishing Attitude
  • Remember to be patient
  • Channel frustration positively
  • Belief comes from experience
Summary

If you integrate even a portion of Phil's Top 10 habits you will be on your way to becoming a better and accomplished stillwater fisher person.

Tuesday, July 29, 2014

Fishing the Yellowstone River - McConnell to Corwin Springs

Each summer I spend a couple of weeks with my family in Bozeman, Montana enjoying the area, and of course fishing. This summer we concentrated on the Yellowstone River in Paradise Valley and below the town of Livingstone.

The Yellowstone River has many access points for putting in and taking out your drift boat or raft. The river changes character as you move down stream from Gardner to the river below Livingston. We fished different runs from below Gardner to about 13 miles below Livingston.

Upper Yellowstone below Gardner - McConnell Landing to Corwin Springs
The river between Gardner and Yankee Jim Canyon which is a stretch of about 13 miles is characterized by some whitewater , flat water, occasional small rapids and riffles. We chose to float the run from McConnell Landing to Cinnabar which is near Corwin Springs. This run is about 5 miles which makes it a leisurely float. The stretch of river provides fishing for rainbow and cutthroats. It offers a great opportunity to cast attractor dry flies like hoppers, yellow stones, trudes and caddis patterns. This section has many boulder gardens with nice pocket water to target as you float on by.

The river has some class 2+ rapids with big waves but no obstacles to speak of, some large boulders but no boat eaters. This float can be accomplished with intermediate rowing skills even with big water in early season. The float has varied water types and is also a very scenic float that I highly recommend.

We rigged up with 7 1/2 foot 3x leaders and two hoppers, a large one and a smaller one, or similar attractor patterns. We had good success casting to the bank and behind boulders catching rainbows, cuttbows and yellowstone river cutthroat. The fish are aggressive and this is an excellent float for beginners and seasoned veterans alike that are yearning to try their luck casting dry flies.

Upper Yellowstone Photos


McConnell Landing Access


Zack with a Yellowstone Cutthroat


Yellowstone River above Corwin Springs


Yankee Jim Canyon

We elected to not run the 3 1/2 mile section of Yankee Jim Canyon with it's class III water. I scouted the river and it has two large mid stream boulders with large holes behind them. These obstacles are not really that difficult as long as you scout the river, make a plan, and then execute that plan. The "Montana Afloat" map states "This segment contains three major rapids and should be attempted only by experienced white water floaters especially during periods of high water". I plan on floating this section one of these days when I have confident and brave passengers. The fishing is stated to be very good early season.

Yankee Jim Canyon Photos


Yankee Jim Canyon looking upstream towards Gardner


Yankee Jim Canyon Middle Section


Yankee Jim Canyon looking downstream towards Paradise Valley

Monday, July 28, 2014

Fishing the Yellowstone River - The Bird Float


One of the most popular floats on the Yellowstone River is the "Bird Float", named for the put in at Grey Owl and the takeout at Mallards Rest. This float is about 10 1/2 miles. I have fished portions of this float over the past three years, mainly Grey Owl to Loch Leven which is about 7 miles. This float is characterized by flat bank water with a few riffles and large mostly submerged boulders. This float is an easy float and a good one for beginning rowers. It is almost all class I and II water.

This stretch of water has rainbows, brown trout and lots of whitefish. We experienced a blanket caddis hatch on a cloudy afternoon which really got the fishing going.

The fishing in this stretch is mostly casting to the bank from a drifting boat with shallow indicator riggs or dries once the river lowers and clears and hatches are apparent. We fished this stretch one day this year, when the river was flowing at about 5400 cfs and had about 4 to 5 feet visibility. We fished it with indicator riggs. We got lots of practice setting, hooking and landing fish, mostly whitefish.

When nymphing you will get acquainted with the Montana Whitefish which are aggressive to small nymphs. Many anglers concentrate using dry flies, casting to the bank to stay away from the whitefish. Although I must say that fishing with indicator riggs and hooking and landing whitefish is a fun and memorable experience for beginning anglers. It is a great way to get the hang of dead drifting, setting and playing fish.

Rigging
Leader - 7 1/2 foot 3x tapered leader

Indicator - Large Thing-a-ma-bobber

Shot - 1 or 2 AB's 3 to 4 feet below the indicator.

1st Fly - 10 " of 3x fluorocarbon Streamer patterns, McCunes Sculpin, Rubber Legs with Marabou tail, Whitefish Minnow

2nd Fly - 20" of 4x flurocarbon, beadhead PT's, beadhead yellow stones, beadhead lightning bugs, caddis nymphs/emergers

Techniques
The technique for fishing this stretch is mainly casting to the bank and dead drifting your rigg to the color transition area, mostly two to three feet off the bank or to current tongues and nervous water. This technique mainly targets the rainbows and the plentiful whitefish and not so much the brown trout.

When targeting the brown trout it is best to watch the banks for brown trout holding water, undercuts, root wads, boulders, eddy water, just any obstruction that creates a good lie for the trout to get out of the heavy flow and be stationed to look for a meal floating by.

As you drift down the banks and as you lock onto and target holding areas, you fire a cast to the bank or even on the actual bank and start long, quick 12" strips back into the main current. You can get strikes from the second the fly hits the water to any time as you are stripping. If you don't get a strike you throw a quick upstream mend and dead drift your rigg until you see the next likely holding spot. Pick up your rigg and fire another cast back to the back. Sometimes you can see the browns charge after the streamer patterns. This is fun active fishing and will produce the larger fish in the river.

Bird Float Photos


"Bird Float" Bank Water


Boulders Along the Banks


Afternoon Thunderstorm


Typical "Bird Float" Brown Trout

Saturday, July 26, 2014

Fishing Soft Hackles

When summer comes around here in Northern California and the caddis get busy I look forward to fishing soft hackles and emergers. This means I can forget about worrying about a dead drift presentation for a while. Well, sort of anyway.

I look forward to heading down to the Lower Yuba River in the late afternoon, usually about 5:30 or so and fishing until dusk. What I'll look for is a run that is below an active, semi-bouncy riffle with a run below it that has depth of 4 to 6 feet. If it has a distinct dropoff at the bottom of the riffle that's even better.

On our local Lower Yuba River we can get a mixed hatch on most evenings. We can have micro caddis, larger summer caddis, mayflies, spinners and PED's late.

Rigging for Fishing Soft Hackles
When rigging for fishing the summer evening hatches I want to give the fish options for what it wants to eat. I rigg to offer the fish different options with a visible dry or cripple as my first fly, an emerger or pupa for the second fly, and a soft hackle for the third, bottom fly.

The rigging method is as following.

(1) Rigg a 9 foot tapered leader off your 18" to 24' butt section off your fly line.

(2) Add a 24" of 4x fluorocarbon tippet to the tapered leader with a surgeons knot leaving an 8 inch tag on the downward side.

(3) Tie your dry fly or cripple to the tag end. My favorite fly is a Quigley's Cripple for this one.

(4) Add another 36" piece of 5x fluorocarbon to the 4x tippet, leaving another 8" tag on the downward side.

(5) Ties your emerger, pupa, or floating nymph that matches the hatch to the tag end. This selection will change depending on the hatch sequence and what the fish are locking into.

(6) Tie your favorite soft hackle at the end. I have been tying my soft hackles with a beadhead so the soft hackle gains depth during the drift and then sweeps up at the end of the drift.

Presenting the Flies
The goal when presenting the flies is to spot rising fish and preferably an individual fish to target. The fish typically are focusing on the emerging bugs and not the bugs on the top. You want to position yourself a good ways above the fish, 30 feet more or less, and about 10 to 20 feet inside of the fish. Careful and stealthy wading is important to gain the correct position.

First Option During the Drift

(1) The presentation cast will be across and slightly downstream to quartering downstream at the most. The best presentations will be quartered downstream.

(2)Target a spot about 10 to 15 feet above the targeted fish.

(3) Deliver your presentation cast and immediately make a big upstream mend. It also works well to cast the flies further than the line you want to fish and pull them back to just where you want them.

(4) Adjust your drift and them make another smaller mend.

(5) Dead drift your flies down to where the targeted fish is located.

(6) When you reach that zone, be alert for a take on the dry, a flash of a fish, or the dry to disappear like an indicator.

(7) Raise the rod tip smoothly if you see of even suspect a take.

Second Option on the Drift
If there is no obvious indication of a take try the next option.

(1) Present your flies as per the First Option.

(2) Throw small upstream mends from time to time to slow the drift of the flies.

(3) When your flies are in the zone, clamp of the line with your rod hand loosely with your finger tips.

(4) Leave a loop of line that is about 10" below the rod.

(5) Let the flies swing and rise in the water column. This is when to expect a time. If you feel a tug just let the loop of line slip out of your fingers and raise the rod tip. If you set to hard you will "rip the lip" or bust off.

(6) If there is no take let the flies swing to the point directly below you. let the flies dangle in the current. This is another point where fish will follow and then take.

Remember it is always best to carefully wade into a position where you can make a quartering downstream presentation rather than extending your cast to reach the fish and casting more directly across stream. Sometimes though your don't have a choice if you are fishing right at a dropoff and the fish are up and feeding.

Using this technique is one of the funnest ways to fish an evening hatch and can bring you some of the most memorable fishing of the summer.

Good Luck!


Friday, July 25, 2014

Bugs - The Hydropsyche, "Spotted Sedge," Caddis

Bugs - The Hydropsyche Caddis


Each year I always look forward to summer and the hydropscyche caddis hatches. This bug is also commonly referred to as “the summer caddis” the “spotted sedge” or the “net spinning caddis”. On the Lower Sacramento River the bug takes on a brown or cinnamon cast. On the Lower Yuba River the bugs tend to have a green cast. The summer evenings will find active feeding fish willing to take caddis emergers and soft hackles. It is my favorite hatch of the year.

Ralph Cutter in his book “Fish Food” states that Hydropsychids are one of the most important of all insects for trout fishermen to know and understand. He also stated that despite this the Hydropsychids are one of the least understood and are poorly replicated. Almost no one fishes them correctly.

Hydrophsyche Facts

1. They are one of the few types of caddis that do not free roam in search for food.

2. The net-spinners build web retreats and let the food come to them.

3. They build funnel- shapped silken traps or span seines across gaps between rocks and sticks.

4. The uncased Hydropsyche is continuously exposed to trout, and ranges in size from 8-16 mm and can cycle through two or more generations in a fishing season.

5. Despite the fact the Hydropsyche builds a web retreat, it frequently strays and is commonly found roaming about streambed, draping strands of silk behind it in the cobbles. The silk not only works as a leash should the larva loose it’s footing, but it is also used by the caddis as a rappel line to lower itself across gaps between the rocks.

6. The larva are earth toned and difficult to see against the streambed background. By contrast the silk strands almost glow and are easily visiible from a distance. Trout have learned to key in to this luminescent line and frequently graze on the silk lines whether they have attached larva or not.
You can lighten the tippet for a foot or so above the larva imitation with a white grease pen, such as a Mean Streak marker.

7. When it comes time for pupation, the Hydropsyche entombs itself inside a dome of gravel. If you peel one of these cases off a rock, you’ll see that the bottom of the gravel dome is a sheet of silk through which you can view the evolving pupa.

8. With the exception of the Rhyacophilla, all other caddis pupa will be completely surrounded by sand and gravel.

Hydropsyche Habitat & Behavior

The preferred habitat of the Hydropsyche Caddis are riffles and runs. They often drift in the current, so where there are large populations, trout will feed on them year-round. A larva pattern dead-drifted near the bottom can be effective very effective in spring and fall, and even in winter.

Like all caddis, net-spinners pass through four stages of development: egg, larva, pupa, and adult. Most species require one year to develop from egg to adult. A few species pass through two generations in a single year.

In general, hatches are sparse in the spring. By June, activity increases. The heaviest activity often occurs in July and August.

Behavioral Drift


The larvae of net-spinning caddis periodically crawl out of their shelters, let go, and drift downstream 40, 50, or even 100 feet. This activity occurs on a daily cycle, and peaks near sunrise and sunset. Entomologists call this "behavioral drift" and speculate that it functions to disperse insect populations, thereby relieving competition and allowing the colonization of underutilized areas.

For the fishermen, it means increased food for trout, making nymph fishing during periods of peak drift very effective.

The Hydropsyche’s Life Line – A Gary LaFontaine Trick

Some hydropsyche caddis larvae throw a twist into normal drift behavior. Instead of simply letting go of the substrate, they attach a silk thread to the bottom and lower themselves downstream on a "life line." In his book Caddisflies, Gary LaFontaine discusses his increased success fishing with net-spinning caddis larva patterns when he colored the last 18 inches of his leader white to suggest this silk anchor line of the natural.


The Pupae


Once the larvae are mature, they seal themselves inside their shelter and transform into pupae. The pupae remain sealed inside until ready to emerge into adults. The complete development of the pupae typically requires four to six weeks.

When ready to emerge, the pupae swim to the surface, which is perhaps the most vulnerable period of the insect's life cycle. Trout feed selectively on the rising pupae, and imitating them is one of the most effective methods to use during a caddis hatch.

Peak emergence activity occurs in the late morning or early afternoon during the spring and fall. In mid-summer heavy hatches occur in the late afternoon and evening.


Hydropyshe Adults

Adult hydropsychids spend most of their time hiding on streamside vegetation. Mating occurs on the foliage, and unless a wind blows them over the water they are unavailable to fish.

Once egg laying begins, however, their vulnerability increases dramatically. Large swarms of gravid females congregate over the water from afternoon to late evening. To lay their eggs, they dive into the water and swim to the bottom, where they deposit strings of eggs on the substrate. Once egg laying is complete, they swim feebly back to the surface.

Such behavior makes them easy targets for feeding trout and an important stage for fly fishers to imitate. On streams like our Lower Yuba River, some of the fastest and most consistent fishing of the season occurs during the last hour of light when the hydropsychids lay their eggs.

Fishing Techniques

During a hatch, dead-drift a pupa pattern near the bottom in riffly water or just below riffles. An unweighted pupa pattern can also be drifted near the surface, or you can present a Soft Hackle with a wet-fly swing. Another good strategy is a dry fly with a pupa pattern as a dropper or trailer; the dry fly acts as an indicator and sometimes is taken by the trout.

After the hatch, errant and unlucky adults fall onto the water, and a dry fly is the right choice. Bankwater downwind or downstream from overhanging trees is a good place to cast your dry.

Females swim or crawl underwater to lay eggs. You can fish a dry at this time, or go subsurface with a Soft Hackle or Diving Caddis pattern.

Summary

Take some of these points to heart and you find out what a hammered take on a soft hackle is all about.

Sunday, July 20, 2014

Knott Creek Reservoir, Nevada


On our yearly summer trip to Montana, Zack and I decided than we would travel there through the Boise area, and stop and see my Mom, Dad, and my brother and his family in Emmett, Idaho. Mom, Laura, decided to let the boys take off early and she'd fly in. We decided we would drive to Winnemucca, NV and head north through eastern Idaho and go through Emmett. We would then head through Stanley Idaho, which is the head waters of the Salmon River, go through the town of Salmon, head over the pass to the Big Hole Valley and then on to Bozeman. The trip took us 4 days but the scenery, the fishing, and visiting family was well worth the option of bombing through straight.

So, as for fishing, I decided to stop overnight at Knott Creek Reservoir. I have heard stories about Knott Creek for years, as a top notch stillwater destination, but with disclaimers that the road is pretty rough and that it wasn't for the faint hearted. I said to myself, "I've got a big Ford diesel, 4 wheel drive, new tires, motor freshly tuned up for a long road trip. It can't be that bad". Well in a way it was that bad, especially towing a drift boat raft on a trailer. In retrospect I should have stopped at the end of the gravel road and chained the boat and trailer to a fence post or telephone pole. There aren't any trees. Problem was that all my fishing and camping gear were inside so that really wasn't an option.

To get to Knotts Creek Reservoir, at least they way we went, you go to Winnemmuca, Nevada and then head north on Highway 95 towards Orvada. You then take a left turn on Highway 140 going west. You go about 3o miles on a paved road and then the rest is improved gravel road with the last 5 miles single track dirt. That's the good part. The last stretch is dirt trail and in the last 1 1/2 miles is rutted and you need to maneuver carefully to avoid deep eroded ruts, mainly from previous people 4 wheeling there way in, when it was wet and muddy. Fortunately for us it was bone dry except for a few easy creek crossings. You just had to stick it in low range 4 wheel drive and go slow. Crawl your way through. As a word to the wise, if you're going to try this when its wet, you'd be best off taking two vehicles, chains for pulling out your partner if you get stuck, shovels, high lift jacks and such. You get the picture?

We finally crested the last ridge and the road leveled out with a slight downhill. We finally got our first look at our destination.


Zack was a pretty happy camper when we finally arrived to a final creek crossing. Being we were about 20 miles from the only ranch we had passed I figured that that last creek crossing just was not worth the risk. Who wants to be stuck in a creek crossing that far from civilization? We decided to camp right there and hike in to fish the next morning.


It was approaching dusk, so we hiked in to get a closer view of the lake. We saw multiple rising fish at the inlet where Knott Creek enters the lake, so we had a good idea of where to head the next morning.

We got up early had a quick bite and started hiking as the sun was just reaching the ridge tops.


We hiked the road down and Knott Creek headed down to the lake at the base of the meadows off to the right.


As we hiked along, we encountered a bunch of interesting rock formations that were along the road. We had not seen anything like these until we got within a mile or so of the lake.


This is where we camped just on the other side of Knott Creek. This shot is looking back as we headed to the lake.


We finally got to the lake and were ready to give it a go. The creek comes into the lake at the left. This area of the lake is very shallow and the fish coming in to feed last night were in shallow water 1 to 2 feet deep. The water is crystal clear so we headed to the right side of the lake to fish from the rocks where I expected it to be deeper.


There were weed beds close to shore and in pockets working away from the shore. I noticed fish cruising in and along the weed beds so I decided to try a damsel fly nymph. I had only brought a dry line, as all my stillwater gear was buried in the boat. I did have one stillwater box available so I just went simple style, a rod, a dry line and one fly box. Just like old times, simple. I decided not to carry my pontoon boat 3/4 of a mile, so fishing from the shore was the best choice. Although I later took my boots and socks off and waded knee deep too keep out of the weed beds a bit. I was able to take some real nice rainbows using a sort 1" retrieve.


This lake would be simply awesome in a float tube or pontoon boat. I'll do that next time when I dedicate a whole weekend for fishing this like.

As Arnold says "I'll be back!"

Saturday, July 19, 2014

Fishing The Yellowstone


Whenever we make it out to Bozeman, Montana, I make a point to call Nathan Gaffey, a guide who works for The Rivers Edge. Zack and Nathan hit it off really well and a good time is had by all. This will be the third year in a row we've made it out with him.

The Yellowstone River is still running high at this time which is abnormal. The flows up around Emigrant are about 5500 cfs and lower on the river at Livingstone they are about 6300 cfs. Big! Clarity is about 3 to 4 feet. The river is just now getting into shape. Nathan recommended that we float from Livingstone down to "The Pig Farm" which is below where the Sheilds River comes in. This float is about 12 miles.We would avoid the crowds and mostly the whitefish that everyone was catching upstream around "The Bird Float". Nathan boated over 30 whitefish and one trout the day before up around Emigrant. When floating the Yellowstone when it is this high you need to be careful and on top of your rowing game. The eddies are just huge and nasty. Some of them look like they could just suck your boat down to the bottom. We were up for it!

The rigging method for the day was with a Thing-a-ma-bobber about 4 feet above a single lead shot, a pretty small one, Nathan tied on a new rubberlegs pattern which is similar to the one's we've all been using except marabou has been substituted for the rubberlegs at the tail. He stated that the green ones have been working. We used assorted beadhead nymphs tied approximately 2 feet off the hook bend as a trailer. During the day we tried other patterns as well including a matuka styled fly that imitated a juvenile whitefish, various beadhead softhackles, (blue, orange-ish red), and pheasant tails.

The fishing methodology was primarily fishing to the bank and searching out water that was slow enough to fish, eddy corners, insides of the riffles and the banks on the slower side of the river. With the river flowing at 6300 cfs or better there is a lot of river that is just not fishable yet.

One of the odd things was that most of the fish hooked or netted were rainbows, which is unusual for the water below Livingstone which is know for its brown trout. I've been thinking about that in retrospect and I think that the water is just running too high and fast to get the flies in front of the noses of the browns. Rainbows are know for there quick striking and I think that the bows were just more aggressive than the browns with the water flowing so fast. I believe that using more weight to get down would have resulted in more browns. It would have also resulted in a bunch off lost flies. It's sort of a risk vs. reward thing. Who knows it was just odd.


This Brown took the rubberlegs just as I said to Nathan, " I think the browns will be in the soft pockets behinds the rocks". Boom, fish on. I had cast to a small eddy pocket 2 feet by 4 feet long behind a bush and wham the fish shot after it. with the flows as high as they were it was hard to hit these types of spots.


Zack managed to hook and bring to the net this 14" cutthroat. It's pretty unusual to find cutthroats below Livingstone. A surprise and treat for Zack.


This was the average sized rainbows of the day. They were feisty and almost everyone hooked would go airborne a number of times. They were vigorous fighters and a challenge to land in the high flows.


You can sort of see the clarity of the water in this shot of landing a rainbow. It was sort of a milky green, good for stealth but just a bit too high and fast.


The train running down the tracks over the bridge sort of brings you back to an older time where the train was the main means of transportation in the west.

I had a great day exploring new water with Zack and Nathan, caught a decent number of hot fish and enjoyed the Montana country side. Another day to enliven the memory banks.

Another Tradition to revisit.

Clay

Sunday, July 13, 2014

Seal Bugger

Rickards Seal Bugger Recipe

Hook: 4x - Tie sizes 6 through 10. This version uses a Tiemco 9395, Size 8
Wire: .020 Lead Wire 20 wraps
Tail: Sparse Marabou 1 1/2 times the shank length and sparse. This version Jay Fair's Black
Rib: Copper Wire
Body: Dubbed Seal and African Goat. This version 4 parts Black Simi Seal, 1 part Reddish Brown Simi Seal.
Hackle: Saddle Hackle Palmered. This version, Hareline Burnt Orange Saddle

Seal Bugger Notes:

I've always been a river and stream guy. Whether its floating a river in my driftboat or raft or fishing high back country creeks. My experience with stillwater has been confined to mainly fishing wilderness lakes in Montana and Wyoming where the trout were always willing and would take just about anything you'd throw at them.

It's just this year that I've decided to take up the study and practice of fishing stillwaters. I'll be sharing what I glean along the way.

I purchased Denny Rickards book titled "Fishing Stillwaters for Trophy Trout" years ago and its been sitting in my bookcase for years. I started my learning process by reading and studying it and refreshed his "Stillwater System" which is a team of impressionistic flies for stillwaters whereever you may roam.

One of his favorite patterns is the Seal Bugger. Here is how you tie them.

I tied up some Seal Buggers and picked up this fish on a Black and Scarlet Seal Bugger. They work!


Denny Rickards Seal Bugger

It is recommended to fish larger sizes 6-8 in the spring and then move to the smaller sizes 10 in the fall.

When selecting marabou feathers for the tail don't use the stiffer portion at the top of the plume including the stem. Use the side portions that have move movement.

Check out saddles dyed by J. Fair. They are top quality for these types of flies.

It is important to have the hackle palmered through the body. This will give the fly a breathing motion that you can't get if the hackle fibers face the rear of the hook. With that said, it recommended to tie them both ways and see which way the fish like best.

Real Seal is very hard to find. Arizona "Simi-Seal" is a very good substitute. Jay Fair also makes "Seal Sub" which is very good.

There is a tendency to either under dub or over dub this fly. Strive for a consistent base with the seal fibers standing at a right angle to the hook shank. If it is done right the fibers pulse and seem more alive.

It is recommended to fish the seal bugger with an intermediate line. You can also use a uniform sink type II, a uniform sink type III or a stillwater line depending on conditions. Try retrieves using a long slow pull or a very short rapid pull.

This fly is designed so the tail moves when stripped, the body pulses and the weight will drop the front portion of the fly when the strip is paused.

As another point to remember, the long slow pull with pulls of 20 to 30 inches is a go to retrieve for all types of larger flies that imitate leeches and bait fish.

Denny ties this pattern in 12 variations with contrasting body colors versus the hackle colors.

This is a great searching pattern that also represents a leech or a dragonfly nymph the best. It is also just a strong attractor. It isn't really a bait fish imitation. Tie them up in olives and browns.

Tying Instructions:

1. Place hook in vice and start the thread wrap behind the eye of the hook. Cover hook about 1/8" down from the eye. Tie in the .020 Lead Wire with thread.


2. Wrap the hook towards the hook bend with 20 wraps of the .020 lead. After tying in the lead run the thread to the end of the hook directly to the hook bend.


3. Pick a small bunch of marabou from the side portion of the feather. You want this to be a sparse bunch. This provides more movement of the tail. Tie the tail in about 1 1/2 times the length of the shank of the hook. Tie in the tail, bind it down and clip off the butts of the marabou.

4. Tie in the copper rib at the tie in point at the tail.


5. Tie in the saddle hackle. Select a webby hackle which is typically located near the stem of the hackle. Tie the hackle in by the butts not the tip. Position the feather so it will be palmered through the body with the hackle pointing towards the eye of the hook.


6. Tie in a dubbing loop that is about 6 inches long. Take a blend of Seal's Fur, 3/4's black and 1/4 scarlet/red. Use a coffee grinder to blend the dubbing materials. Place the fur cross-wise into the dubbing loop. Hold the material with your hand to keep the material from spinning and then spin the dubbing loop tool while holding the material. Let go of the material and it will spin itself. Pick out the excess to create a consistent rope. You can add more material below to extend the length of the dubbing rope if you need to lengthen the rope.

7. Once you have the correct amount of material in the rope continue spinning the dubbing loop tool. The key is to have the right amount of dubbing. If you use to much material it will tend to float the fly. Experiment until you get a sparse looking body with the fibers standing at a right angle to the shank of the hook.

8. Spin the loop tool a bit more and start placing wraps one in front of the other towards the eye of the hook. The seal fibers should be standing at a right angle to the hook shank. Wrap the rope forward until you just cover the lead wire and tie the rope off. Clip off the remaining rope.


9. Wrap the copper rib forward, not too tight and wrap about 10 times on a 4x hook. The copper ribbing is not real visible when you are tying the fly, but when the fly gets wet the brass shines through the dubbing. Tie off the wire at the head of the fly.

10. Once the copper rib is tied off use a bodkin and pick the trapped seal feathers out. You want the fibers to be standing out at a right angle to the hook shank. This is also why you don't want to wrap the copper wire too tight. By wrapping it loser, the fibers pick out more readily.


11. Wrap the hackle forward with 4 turns only. More than 4 turns will tend to float the fly. The other reason for only using 4 turns is to create segmentation. It also allows for the hackle and dubbed fibers to move and seem more alive. Tie off the hackle at the head and pick out fibers that have been bound down by the hackle stems. Be careful not to break the hackle stem when doing the final picking out of the fibers.


If the hackle fiber breaks, just tie in another hackle, no big deal. You can also do this is a fish rips it loose. Don't throw the fly away just tie in another hackle.

The finished fly. Try it, you'll like it.


How to fish the Seal Bugger

1. This is best fished with a long slow pull, 20 to 30 inches with the tip of the rod in the water. Try different speeds of the long slow pull until you find the speed the fish like.

2. Another retrieve is the short quick pull, 1 to 2 inch pulls in quick succession.

Saturday, July 12, 2014

The Fat Albert or the Chernoble Juicy Bug


My fishing brain trust, me and my fishing buddies, have been playing around with some dry fly attractors on the Lower Yuba and have been enamored with a Fat Albert type fly. This pattern is also called a Chernobyl Juicy Bug by Umpqua.

Many of the Fat Albert ties are wider and more robust looking. While the Juicy Bug tie is longer and the profile is thinner. You can play around and see what profile the trout in the rivers and streams you are fishing work best. You can play around with the leg colors too.

Fat Albert Recipe

  • Hook - Tiemco 5262 - A 2X-long dry fly hook. The long shank makes it useful for imitating hoppers.
  • Thread - 140 Denier Black Thread or 140 Denier Brown
  • Body: 1/8 Foam, Tan and Brown
  • Indicator: White Post Material
  • Legs: Round Rubber Leg
Tying Instructions for the Fat Albert

Sounds Simple Right? Well let's Tie one up and we'll see.

Step #1 - Start the thread right behind the eye and make a thread base at least partially down the bend of the hook. Return the thread to within a few eye lengths back from the hook eye.


Step #2 - Cut a strip of brown foam that is about as wide as the gap of the hook. This strip should be at least four inches long. Tie the brown foam strip to the hook up near the eye and wrap back over it to the bend.

Step #3 - Continue past the bend a bit to anchor the foam down onto the curve of the hook. Wrap forward again with the thread to the front of the hook.


Step #4 - Cut a strip of tan foam that is about as wide as the gap of the hook like you did for the brown foam.

Step #5 Tie this tan strip in as you did with the brown foam, at the front of the hook on top of where you tied in the brown foam.Wrap back over the tan strip to the bend. Try to bind the foam down tightly as you wrap.


Step # 6 - Spend as much time as is necessary to cover all the foam on the shank with a nice smooth layer of thread as shown here. Be patient and get the foam completely covered with thread.

Step #7 -Bring the thread to about even with the hook barb and let it hang there in preparation for the next step.


Step #8 - Pull the tan foam forward and bind it down with two tight wraps of thread at a point about even with the hook barb(or between the barb and the point).


Step #9 - Lift the foam again and move the thread forward an equal distance. Lay the foam down again and bind down the second segment. Repeat the above process one more time to create three segments that extend just past the halfway point on the shank.

Note - For the Juicy Bug use a longer 3x hook and make 4 segments.


Step #10 - Pull the brown foam strip over the top of the tan foam segments and bind it down in the last tan foam section.


Step #11 - Cut a clump of clear crinkle synthetic post materials of choice. Bind it down in that same segment section at the center of its length. You want to use a material that compresses well and will create very little bulk. Less is better.


Step #12 - Take another tan foam strip (as wide as the hook gap) and tie it down in that same segment (by now you have realized to go easy on the number of wraps for each of these material tie downs...the cumulative effect is plenty to hold everything down but you don t want to make too many turns on any one material to keep the bulk to a minimum)


Step #13 - Cut the synthetic post material down to a short little puff.


Step #14 - Now for the fun stuff. Take a length of rubber leg material, fold it in half and tie an overhand knot so the two strands knotted together form a doubled up leg with a knot. Lay the leg alongside the far side of the hook with the knot at the legs right at the end of the foam body.The rear legs are tied in the same spot as the foam pulled forward earlier.

Step #15 - Tie up another double leg with a knot and tie on the side closest to you. Again, the knot the legs right at the end of the foam body.


Step #16 - Lift all three sheets of foam up and out of the way while you work the thread up to just behind the hook eye.

Step #17 - Lay the first tan foam strip down and bind it in place just behind the eye with a couple tight turns of thread.

Step #18 - Bind the brown foam down on top of the tan foam.

Step #19 - Bind the other tan strip down on top of the brown foam. Try to keep all the strips on top of each other.


Step # 20 - Clip the front end of all three foam strips just beyond the hook eye.

Step #21 - Tie in a single (un-knotted) strand of rubber leg along the near side of the hook in that front joint.

Step #22 - Tie another strand of rubber leg in along the far side of the hook as well.

Step #23 - Tie another strand of rubber leg in along the far side of the hook as well.


The Finished Product

The finished Fat Albert should look something like this.


Quartering View

Bottom View


Top View