
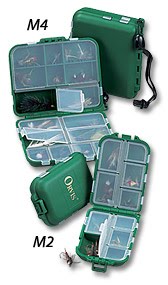
The box is a small Orvis M4 compartment box with 16 compartments with individually openable lids. Some bigger and some smaller. It's about 4" wide x 4 3/4" tall x 1 3/8" thick. It has a handy lanyard that you can hang around your neck or a bag if you want to.
I've got this box stocked with toothpicks to secure the beads to the tippet, hooks in various sizes and beads of different colors and sizes from "Troutbeads." I purchased most of my beads online from http://www.troutbeads.com/
"Troutbeads" has a huge assortment of beads with multiple shades and variations of colors. They also have many textures. They are also pretty cheap, so I don't mind buying different colored beads to experiment with. This part of the "Bead Game."
"Troutbeads" have colors like; Natural Roe, Dark Roe, Caramel Roe, Glo-Roe, Orange Pearl, Peach Pearl, Salmon, Cheese, Shrimp, Cream etc. The idea is to match the color of the bead to the color of the natural eggs. These colors are only the tip of the iceberg. If you are going to get into the "Bead Game" you will probably need to invest in a couple of large plastic compartmented boxes to store all the different sizes and colors of beads and hooks. You can stock a small box like the M4 of mine on the day you go out fishing with the beads that you think will work or that you want to experiment with.
The "Troutbeads" come in sizes of 6, 8, 10, and sometimes 12mm. You also need to match the size of the eggs. I usually start fishing with 8mm eggs unless someone in the know tells me otherwise. On the Lower Sacramento River when 8mm beads just aren't happening and then you switch to a 6mm bead in the same colors sometimes the trout start biting again.
When trying to select the right color and size of bead to use you need to match the eggs of the Chinnock Salmon in our Northern California Rivers. Salmon enter our rivers and spawn in seasonal waves. A spawning salmon may dig a redd in November, but there may also be drifting salmon eggs that were laid in the gravel weeks before. The trout will have a preference for a certain stage of the egg.
When trying to select the right color and size of bead to use you need to match the eggs of the Chinnock Salmon in our Northern California Rivers. Salmon enter our rivers and spawn in seasonal waves. A spawning salmon may dig a redd in November, but there may also be drifting salmon eggs that were laid in the gravel weeks before. The trout will have a preference for a certain stage of the egg.
The only way to pick the right egg imitation is by experimentation. You should carry lots of different eggs to cover all possible scenarios. Once you find a working solution, you'll need to stay alert because trout may change their preference during the day or on a different part of the river.
I gathered some of the rigging and painting information assembled below from articles from http://www.westfly.com/
As a basic guideline, the diameters of beads used for Chinook salmon in Northern California are 8.0 mm to 12.0 mm. Steelhead and Rainbow Trout eggs are about 5.2 mm.
Fingernail Polish Applied to Troutbeads
I have been talking with Frank Rinella, a local guide, about how he and other guides on the Lower Sacramento River uses Troutbeads. He has said that they like to paint the beads with fingernail polish. The purpose of painting a bead is to give it the subtle hue of an egg that has milt on it. He usually paints up his beads close to the time he is planning on fishing with them. They look "fresh" that way. I've also read about painting beads with a small orange dot to simulate an egg that is starting to develop.
When painting a bead for usage on the Lower Yuba River, I have been advised to select a fingernail polish that has a pinkish-ivory tint (Shear Peach by Revlon seems to be popular). Some guides apparently can be quite secretive about their favorite fingernail polishes.
 Before painting a bead, open a window! Fingernail polish has potent solvents that you don't want to smell too long. To paint a bead with fingernail polish, put the bead on a round toothpick. Hold the nailbrush up to the bead and roll the toothpick with the fingers of your other hand so the polish goes on evenly and covers all the bead. You don't want a gloppy finish; make it smooth. Gloppy finishes usually come from getting too much fingernail polish on the brush. Also, avoid getting polish on the toothpick; if you do, polish may pull off the bead when you remove the toothpick. When the bead is painted, stick the toothpick in a block of styrofoam or similar material while the polish dries.
Some guides in Alaska like to put on two coats of polish. The second coat is a different color and gives the bead a 3D look.

Rigging Bead Eggs
To fish with bead eggs, on the Lower Yuba River rig up a leader of 2X or 3X. A tapered leader works well. Tie on a 12-inch super-fluorocarbon tippet with a blood knot. Put the bead on the tippet below the blood knot. Tie on a size 8-10-12 egg hook similar to a Tiemco TMC2499SP-BL. The size of the hook will depend on the size of bead that you use. I've read that trout and steelhead can be also fussy about the hook color, so some anglers carry these hooks in red, green, black, and brown. I have not tried this myself.
To fish with bead eggs, on the Lower Yuba River rig up a leader of 2X or 3X. A tapered leader works well. Tie on a 12-inch super-fluorocarbon tippet with a blood knot. Put the bead on the tippet below the blood knot. Tie on a size 8-10-12 egg hook similar to a Tiemco TMC2499SP-BL. The size of the hook will depend on the size of bead that you use. I've read that trout and steelhead can be also fussy about the hook color, so some anglers carry these hooks in red, green, black, and brown. I have not tried this myself.
For our local river, the Lower Yuba River, the local guides recomend to peg the bead to the tippet with a toothpick about 3/8 inch to 1/2" from the eye of the hook (that's right: the bead is not on the hook). Use a toothpick (color to match the bead if available) and slide the toothpick into the bead and push it all the way flush with a pair of pliers or foreceps. You don't want any of the toothpick to stick out of either side of the bead.
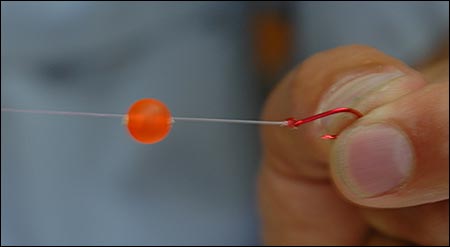 The photo at the right shows the bead approximately 3/4" to 1" from the eye of the hook. If the fish in the river you are larger, steelhead and larger trout some guides will increase the distance from the eye. The key is to be able to hook the fish inside the mouth and in the corner of the jaw. If you find that you are hooking fish on the outside of the jaw the bead is too far away from the eye of the hook.
One article I read about using beads in Alaska suggests using two beads, if the regulations permit. A large cream coral or pearl peach bead without a hook can serve as an attractor. Peg it to the tippet three to five inches above the "real" bead. You'll have to ask Frank about this one!
Also, some fly-fishing-only waters do not allow a bare hook, so check the regs before you rig.
Attaching Eggs to a Hook
Another way to rigg Troutbeads is to "burn" them onto the hook.
(1) You can also take an egg hook and hold it in a pair of lockable foreceps.
(2) Take the bead you want to use and insert a toothpick into one side of the hole.
(3) Break a portion of the toothpick off, so the toothpick only goes halfway through.
(4) Heat the hook with a "Bic" type lighter for about 4 or 5 seconds.
(5) Press the bead onto the back of the heated hook.
(6) The toothpick should be pointing vertically when you press on the egg.
(7) Take the toothpick out after the hook cools down.
(7) You are good to go.
Try the "Bead Game" you'll have some fun with some trout and steelhead tearing up and down the river.

Chinook Salmon on the Yuba
If you want to check out my Flyboxes #1, 2, 3, &4 check out my earlier blog posts at http://www.flyfishingtraditions.com/
Clay
No comments:
Post a Comment
Have any Questions or Comments? Let me know, Clay.