
Showing posts with label Fly Tying. Show all posts
Showing posts with label Fly Tying. Show all posts
Thursday, September 17, 2015
Poodle Sniffer - Black Caddis
Here's another fly tying video tying the "Poodle Sniffer" pupa to match a Glossoma Caddis


Tuesday, December 23, 2014
Skwala "Knothead" Prototype
12/19/2010
I've been able to play around at my vise with the rain pounding down for the last week or so. The Lower Yuba flows are receding a bit, but today they are still running at over 12,000 cfs, which is down from 20,0000 two days ago. When all this is over hopefully the Skwalas will have survived and be starting up.
I'm trying to refine two types of Skwala dries, one for the bouncier, nervous water, which so far is the prototype "Skwalanator" and now I've come up with a slow, eddy water prototype pattern I'm calling the "Knothead".
The resident rainbows will take a Skwala Dry with reckless abandon sometimes in the nervous moving water when the Skwalas are in the drift, many patterns work, some better than other. When the fish are staged in slack or eddie water feeding on the helpless Skwalas it's a different story, a much more imitative pattern is required. Twitching the fly can help but I'm convinced that you need to get (1) the profile correct (2) the size correct and (3) the color much closer to the natural. Thus the need for two separate patterns.
This is all conjecture and experimentation and will hopefully be put to test in January.

This "Skwala Knothead" prototye pattern is tied with a bullet head using gray dun died compradun deer hair. It has a dubbed body and a sparse overwing. I've trimmed the palmered hackle that runs through the abdomen on the bottom to enable the fly to float flush or just below the film. I'm still looking for the right rubberleg material and this mini black rubberleg material may be to large. Like I said it is a prototype until the fish tell me they like it.

Pattern Recipe for the "Yuba Knothead"
Hook: Tiemco 2312, Size 12
Thread: 6/0 Olive (I like to use the 6/0 for the deer hair bullethead)
Egg Sack: 1/8" black foam cut to 3/32" wide. (Double over and tie about 1/8" past the hook bend).
Palmered Hackle: Size 14 black dry fly hackle
Body: Yellow antron dubbing wrapped with the Olive thread (When the yellow dubbing is wrapped with the olive thread the olive color blends with the yellow dubbing to give it the yellow/olive cast that you need to match the Yuba River Skwalas.
This is the second major change from all the patterns on the market.
Under wing: Hareline No-Fray Wing Material Black (Fine mesh wing material like micro window screen)
Over wing Flash: 5 to six strands of Krystal Flash
Bullethead/Overwing: Dark Brown Deer Hair - (Sparse Wing)
Rubber Legs: 2 pairs of Hareline Fine Round Rubber Legs Black
Visible Over Wing: Small bunch of orange dyed Deer Hair
Once the fly is completed, carefully trim the deer hair overwing and remove all the deerhair at the bottom and on the two sides until you get the desired profile of a sparse overwing. I've left some on the sides as I just think it makes the fly look buggier. If the trout don't like it I'll just trim more off the sides.
Also trim the palmered hackle off the bottom of the fly.
I can't wait to test this pattern out!
I've been able to play around at my vise with the rain pounding down for the last week or so. The Lower Yuba flows are receding a bit, but today they are still running at over 12,000 cfs, which is down from 20,0000 two days ago. When all this is over hopefully the Skwalas will have survived and be starting up.
I'm trying to refine two types of Skwala dries, one for the bouncier, nervous water, which so far is the prototype "Skwalanator" and now I've come up with a slow, eddy water prototype pattern I'm calling the "Knothead".
The resident rainbows will take a Skwala Dry with reckless abandon sometimes in the nervous moving water when the Skwalas are in the drift, many patterns work, some better than other. When the fish are staged in slack or eddie water feeding on the helpless Skwalas it's a different story, a much more imitative pattern is required. Twitching the fly can help but I'm convinced that you need to get (1) the profile correct (2) the size correct and (3) the color much closer to the natural. Thus the need for two separate patterns.
This is all conjecture and experimentation and will hopefully be put to test in January.

This "Skwala Knothead" prototye pattern is tied with a bullet head using gray dun died compradun deer hair. It has a dubbed body and a sparse overwing. I've trimmed the palmered hackle that runs through the abdomen on the bottom to enable the fly to float flush or just below the film. I'm still looking for the right rubberleg material and this mini black rubberleg material may be to large. Like I said it is a prototype until the fish tell me they like it.

Pattern Recipe for the "Yuba Knothead"
Hook: Tiemco 2312, Size 12
Thread: 6/0 Olive (I like to use the 6/0 for the deer hair bullethead)
Egg Sack: 1/8" black foam cut to 3/32" wide. (Double over and tie about 1/8" past the hook bend).
Palmered Hackle: Size 14 black dry fly hackle
Body: Yellow antron dubbing wrapped with the Olive thread (When the yellow dubbing is wrapped with the olive thread the olive color blends with the yellow dubbing to give it the yellow/olive cast that you need to match the Yuba River Skwalas.
This is the second major change from all the patterns on the market.
Under wing: Hareline No-Fray Wing Material Black (Fine mesh wing material like micro window screen)
Over wing Flash: 5 to six strands of Krystal Flash
Bullethead/Overwing: Dark Brown Deer Hair - (Sparse Wing)
Rubber Legs: 2 pairs of Hareline Fine Round Rubber Legs Black
Visible Over Wing: Small bunch of orange dyed Deer Hair
Once the fly is completed, carefully trim the deer hair overwing and remove all the deerhair at the bottom and on the two sides until you get the desired profile of a sparse overwing. I've left some on the sides as I just think it makes the fly look buggier. If the trout don't like it I'll just trim more off the sides.
Also trim the palmered hackle off the bottom of the fly.
I can't wait to test this pattern out!
Monday, December 15, 2014
The Yuba Skwalanator - The Experiment

Note: The colors are definitely more golden than this photo captures
Introducing "The Yuba Skwalanator". I've been on a quest since last winter after being humiliated by refusal after refusal of every Skawala dry fly I had in my box, to come up with a better pattern to match the Skwalas on our local Lower Yuba River. I had decent luck last February and March with the standard patterns I carry when fishing the nervous types of water, but when the fish would move down into eddy type water or the flats below riffles where they could really take a good look at the flies, no takers. They turned up their noses and said "Fakers go home!" They would take live Skwalas inches from my dry fly put no dice.
So in an effort to refine this pattern I have collected just about every pattern on the market out there and talked to my fishing buddies, taken many mental notes and this is the pattern I've come up with this tie.
Recipe for the "Yuba Skwalanator" (Arnold is still Governor by the way).
Hook: Tiemco 2312, Size 12 (This is the first major change. The Lower Yuba Skwalas are smaller than most patterns in the market)
Thread: 6/0 or 8/0 Black ( I like to use the 8/0 because of the many materials used in this pattern.
Egg Sack: 1/8" black foam cut to 3/32" wide. (Double over and tie about 1/8" past the hook bend.
Palmered Hackle:
Body: Blended antron dubbing 2/3 golden, 1/3 olive. ( This is the second major change from all the patterns on the market. The Skwala on the Yuba river are more Golden Olive with emphasis on the golden)
Under wing: Hareline No-Fray Wing Material Black (Fine mesh wing material like micro window screen)
Over wing Flash: 5 to six strands of Krystal Flash
Wing: Dark Brown Deer Hair - (Sparse Wing)
Dubbing at Thorax: Blended antron dubbing 2/3 golden, 1/3 olive
Rubber Legs: 2 pairs of Hareline Fine Round Rubber Legs Black
Hackle: Black Dry Fly Hackle size 14
That's a lot of materials to fit on that size 12 hook. Minimize your wraps and dubb with very small amounts of dubbing. Sparse!
Can't wait to give it a go. If I was a trout, I'd eat it. If they work I'll sell them on the river for $20 a pop. Kidding!
As a note: I've tied some of these with the Deer Hair wing using the cut butts over the wing. I've heard that that has made a difference. I took photos of this with a standard wing because it was prettier. I guess the trout might like the weird hair do.
Thanks to Norm Sauer, Tom Page, Keith Scott and Frank Rinella for their insights on the Lower Yuba River Skwala hatch. Also thankd to ralph Wood who came up with a Skwala Pattern that inspired this sort of "Stimulator Tie". Thus watch out for the Yuba Skwalanator.
Wednesday, November 12, 2014
Tying the Pettis Egg
11/11/09
I hit the Lower Yuba River with two newer friends, Frank Rinella and Tom Page. They are both guides in the area. The day seemed to be perfect with some overhead clouds and not the bright sun that we have been becoming used to in the past weeks. I could tell when we got to the put in that Keith Kaneko was already on the river and probably had been on it for awhile because it was about 8:15 and he was nowhere to be seen. He's been hitting the river pretty early which by the way is probably a good idea. As we were getting ready to go Dave Sloan from American River Flyfishing showed up with a couple of clients. This turned out to be it for the day. 2 guide boats and ourselves. There were of course wading anglers in many locations.
We did our shuttle to the Maryville Gun Club, which was nice for me as I am not a member of that club and have not fished down that far for years. I usually pull out at Sycamore Ranch which is upstream.
We started downriver with Tom rigged up with indicator and nymphing rig. Frank rigged up with no indicator as he likes to tight line his rigg as it works the water column. The nymphing was tough and even with changing a myriad of nymphs, eggs, streamers etc. We just could not find the fish or what they wanted all morning. Frank hooked up and landed a nice fish at about 11:00 or so. Shortly later Tom had a big down and was fast to a heavy fish. The fish was dogging and we started to think. Sucker? Sqwawfish? Sure enough. It was a big one though.
We fished the river hard and when we got closer to Hammond Grove Frank hooked a nice fish that went aeriel a couple of times. Frank played the fish steadily and we netted it. This was a fish that at first looked to go 20 to 21 inches but was quite a bit larger and was very thick. Tom quickly took a photo and we released the fish without really measuring it. Tom thought it went 5 or 6 pounds. All I know is that it was a slab.
All in all I think we had 5 or 6 fish in our hands, but there were a number of hookups with fish on but unable to keep on for very long.We had the best luck with eggs even though we've been hearing that it had become a mostly bug bite lately.
In the past month or so, I've been fishing mainly with a "Pettis Egg" that has a "Spirit River" burgandy colored plastic bead with "Cascade Egg Yarn" pulled over it in differnt shades. I'd been having good sucess with this pattern. All of a sudden it just doesn't seem to be working. Frank likes to use "Troutbeads" in different colors and keeps changing them up to find the color and size that works. He apparenttly is on to something. It also goes to show that if you put an egg in front of a trout or steelhead it will probably gobble it up.
All in all a great day with new friends. Can't beat that.
Clay
Pettis Egg Pattern
Products for this fly:
• Tiemco TMC 2457 Hooks
• Uni 6/0 Tying Thread
• Spirit River Plastic Egg Beads
• Cascade Egg Yarn

Step 1 Slide the bead onto the hook.

Step 2 Start your thread behind the eye of the hook and coat the hook shank

Step 3 Take a clump of Egg Yarn and push it over the eye of the hook so that the eye of the hook is directly in the center of the clump of yarn. Make some thread wraps to tie the clump of Egg Yarn in directly behind the eye of the hook. The clump should be thin enough so that when it is pulled back, the glow of the bead will still shine through a bit. It will take a few flies to get the proper amount of yarn right.

Step 4 Wrap over the butts of the Egg Yarn and slide the bead up to them. Then In one wrap move the thread to the other side of the bead and coat the shank of the hook with thread back to directly above the barb of the hook.

Step 5 Using your fingers, sweep the Egg Yarn back over the bead. It will be almost like turning the clump of Egg Yarn inside out. The yarn should be completely encompassing the bead.

Step 6 Once the Yarn is pulled tight back over the bead, move the yarn forward slightly with your left hand and it will balloon out. Make several wraps around it with your thread and you will get nice round egg.

Step 7 Clip the end of the yarn as tight to the thread wraps as possible and whip finish at the back of the fly. When tied properly you should be left with a very round egg and be able to see the glow of the glass bead through the egg yarn.
Fly Pattern from American Fly Fishing Co. americanflyfishing.com
I hit the Lower Yuba River with two newer friends, Frank Rinella and Tom Page. They are both guides in the area. The day seemed to be perfect with some overhead clouds and not the bright sun that we have been becoming used to in the past weeks. I could tell when we got to the put in that Keith Kaneko was already on the river and probably had been on it for awhile because it was about 8:15 and he was nowhere to be seen. He's been hitting the river pretty early which by the way is probably a good idea. As we were getting ready to go Dave Sloan from American River Flyfishing showed up with a couple of clients. This turned out to be it for the day. 2 guide boats and ourselves. There were of course wading anglers in many locations.
We did our shuttle to the Maryville Gun Club, which was nice for me as I am not a member of that club and have not fished down that far for years. I usually pull out at Sycamore Ranch which is upstream.
We started downriver with Tom rigged up with indicator and nymphing rig. Frank rigged up with no indicator as he likes to tight line his rigg as it works the water column. The nymphing was tough and even with changing a myriad of nymphs, eggs, streamers etc. We just could not find the fish or what they wanted all morning. Frank hooked up and landed a nice fish at about 11:00 or so. Shortly later Tom had a big down and was fast to a heavy fish. The fish was dogging and we started to think. Sucker? Sqwawfish? Sure enough. It was a big one though.
We fished the river hard and when we got closer to Hammond Grove Frank hooked a nice fish that went aeriel a couple of times. Frank played the fish steadily and we netted it. This was a fish that at first looked to go 20 to 21 inches but was quite a bit larger and was very thick. Tom quickly took a photo and we released the fish without really measuring it. Tom thought it went 5 or 6 pounds. All I know is that it was a slab.
All in all I think we had 5 or 6 fish in our hands, but there were a number of hookups with fish on but unable to keep on for very long.We had the best luck with eggs even though we've been hearing that it had become a mostly bug bite lately.
In the past month or so, I've been fishing mainly with a "Pettis Egg" that has a "Spirit River" burgandy colored plastic bead with "Cascade Egg Yarn" pulled over it in differnt shades. I'd been having good sucess with this pattern. All of a sudden it just doesn't seem to be working. Frank likes to use "Troutbeads" in different colors and keeps changing them up to find the color and size that works. He apparenttly is on to something. It also goes to show that if you put an egg in front of a trout or steelhead it will probably gobble it up.
All in all a great day with new friends. Can't beat that.
Clay
Pettis Egg Pattern
Products for this fly:
• Tiemco TMC 2457 Hooks
• Uni 6/0 Tying Thread
• Spirit River Plastic Egg Beads
• Cascade Egg Yarn

Step 1 Slide the bead onto the hook.

Step 2 Start your thread behind the eye of the hook and coat the hook shank

Step 3 Take a clump of Egg Yarn and push it over the eye of the hook so that the eye of the hook is directly in the center of the clump of yarn. Make some thread wraps to tie the clump of Egg Yarn in directly behind the eye of the hook. The clump should be thin enough so that when it is pulled back, the glow of the bead will still shine through a bit. It will take a few flies to get the proper amount of yarn right.

Step 4 Wrap over the butts of the Egg Yarn and slide the bead up to them. Then In one wrap move the thread to the other side of the bead and coat the shank of the hook with thread back to directly above the barb of the hook.

Step 5 Using your fingers, sweep the Egg Yarn back over the bead. It will be almost like turning the clump of Egg Yarn inside out. The yarn should be completely encompassing the bead.

Step 6 Once the Yarn is pulled tight back over the bead, move the yarn forward slightly with your left hand and it will balloon out. Make several wraps around it with your thread and you will get nice round egg.

Step 7 Clip the end of the yarn as tight to the thread wraps as possible and whip finish at the back of the fly. When tied properly you should be left with a very round egg and be able to see the glow of the glass bead through the egg yarn.
Fly Pattern from American Fly Fishing Co. americanflyfishing.com
Monday, September 29, 2014
The Egg Bite - Using Glo Bugs on the Lower Yuba River
It's the last week of September and the salmon have just started moving into the Lower Yuba River system. A few have just started staging and are starting to dig their redds. Resident rainbows and steelhead will soon be staged behind them ready to gobble up protein from stray eggs drifting downstream where they wait. It is almost the time for the "Egg Bite" to ramp up. In this and a following article, I will discuss how to get ready for the "Egg Bite", flies to use, how to rigg them and the techniques to present them.
When the salmon are in the system in seems like the trout and steelhead know it before we do. They just sense the opportunity. When drifting the Lower Yuba I have noticed the trout get on the egg as early as August. There are usually a few "springers" still in the system and the days are starting to get shorter. The fish know its coming.
First a word on Wading Etiquette
For fishermen, fishing the redds creates a dilemma. We'd like to take advantage of the staging of the trout and steelhead, but when fishing with egg patterns, we must stay off the redds. We need to understand that by wading through or on top of the redds we may be destroying the salmon's future offspring. Look before you wade in. If you see bright clean gravel devoid off larger stones, Stay Out! Fish from the shore and cast below spawning salmon to where the trout and steelhead should be. Some people say it's OK to wade the ridges of the redds, but I and many of the guides think it's better not to. It's too easy to push gravel down on top of the salmon's eggs or let the current push you down inside the redd itself. Better safe than sorry.
OK, enough of the sermon, I just stepped off the pedestal.
Egg Patterns
There are basically three main types of eggs patterns (1) Glo Bugs (2) Beads, or (2)Alevin Patterns. The first two are used to imitate the eggs dropped by the salmon and the Alevin is to imitate the hatching fry still attached to the egg, sort of a salmon polliwog. The use of Trout Beads is somewhat controversial, abd has to do with th length that the hook trails behind the egg. I'll get to that in Part 2.
Today in this article, I'm going to focus on "Glo Bugs" and "Pettis" or "Surreal Eggs".
Glo Bugs or Yarn Eggs
 You can tie or purchase Glo Bug patterns in a multitude of colors and sizes. They are tied using egg yarn.
The photo shows a box with every color of the rainbow, This is typical in Alaska, not quite as important here in Northern California. I usually carry about 4 or 5 colors in three sizes. Typically from about 6mm to as 10 mm. I'll usually start with a 8mm egg. The fish can get selective to a very specific color and its a game of experimentation to find out which color works on any given day. The newer the eggs the darker in color.

Some of the popular colors are champagne, peach, salmon egg, Shrimp pink and Steelhead Orange. They are available at almost every fly shop around. You can get tying instructions easily on the web. They are easy and fun to tie. Here's a photo showing some examples.
Pettis and Surreal Eggs
 My favorite egg pattern is the "Pettis Egg". The Pettis Egg is tied with "Cascade" Egg Yarn. If you are going to tie this pattern buy the "Cascade" egg yarn, you will be disappointed if you don't. This pattern is often sold as a "Surreal Egg" which is the same pattern.
I tie the "Pettis Egg in the following colors with Cascade Egg Yarn. Baby Pink, Salmon, Yellow Roe, Champagne, and Flame. You will need to find a dark red or dark orange bead that the yarn is pulled over. These beads are also available from Cascade. The yarn provides sort of a halo around the dark bead. This is what makes it different and special.
Selecting the Right Color and Size
When trying to select the right color and size of egg to use you need to match the eggs of the Salmon in our Northern California Rivers. Salmon enter our rivers and spawn in seasonal waves. A spawning salmon may dig a redd in November, but there may also be drifting salmon eggs that were laid in the gravel weeks before. The trout will have a preference for a certain stage of the egg.
The only way to pick the right egg imitation is by experimentation, although early on the darker shade typically work well. You should carry lots of different eggs and sizes to cover all possible scenarios. Once you find a working solution, you'll need to stay alert because trout may change their preference during the day or on a different part of the river.
Presentation
You can present eggs in 4 basic ways. (1) Dead drifting in runs under indicator (2) High sticking eggs at pronounced drop offs (3) Tight lining through the redds behind spawning salmon or (4) High sticking in the redds under indicator.
(1) Dead Drifting in Runs Under Indicator
For fishing in runs, I'll rigg up with a deep indicator rigg. I'll tie on a 7 1/2 foot or 9 foot 3x leader and place a large thing-a-ma-bobber about 18 inches down from the end of the flyline. Next, I'll tie a tippet knot about 6 feet down from the indicator to hold my shot. Finally I'll extend a 3x tippet to an egg and then trail the egg with a couple of nymphs. This is my basic deep nymphing rigg that I use all the time. The depth is changed by adding or subtracting tippet or raising or lowering the indicator.
Fish it dead drifted from a boat or from a stationary position from shore. The takes when fishing eggs are seldom subtle. This is opportunistic presentation and the fish in the runs often can't resist an egg dead drifted in the water column.
(2) High Sticking at Pronounced Drop Offs.
For fishing drop offs, you want to rig up with shot and indicator and set your indicator to above 1 1/2 times the depth of the run below the drop off. Use enough shot, more than you think, to get the flies down.
You will first be fishing this rigg on a tight line after making a straight line cast and then transitioning to a deep nymph dead drift presentation and finally holding the line and letting the flies swing up in the current.
Look for areas where there are pronounced drop offs of 3 feet or more. When salmon are in the system and moving up stream they often stop and rest at these drop offs. The resident rainbows and trout will be there with them.
Station yourself just opposite the drop off or slightly down stream from it and cast your flies up above the drop off, the cast wants to be more of a straight line cast. Hold up your rod tip to keep as much line off the water as possible and let the flies drop down into the drop. Don't mend when the flies land, just let them tumble down. Make sure you have enough shot to get the flies down deep. There can be takes right as they drop. Watch you indicator and the tip of your nymph line for any movement. Set at anything suspicious.
Once the flies drift down to just slightly below where you are positioned throw a big upstream mend or a stack mend and feed line downstream keeping a slight hook in you line, like a small "C" , and work the water below you.
Once you have dead drifted the flies as far down as is stll manageable clamp off the line and let the flies swing up in the current. This often brings on a strike. Fish it out until the flies swing below you. Let them hang and then re-cast.
Use the Borger Shot Gun method and methodically cover the water working from closer to farther out.
(3) Tight Lining Through the Redds
When the salmon are staged on the redds the resident rainbows and steelhead will often be waiting directly behind them waiting for stray eggs. Steelhead are know to actually come up and bump the salmon trying to shake loose some eggs. The key is to focus on the area behind the salmon. If you try to run your flies through a pod of salmon you will snag the salmon which is illegal. It's hard, but don't do it.
To rigg for fishing the redds with the tight line method you can shorten up your leader, use less shot and shorten the distance between your flies to about 12 to 14 inches. Often use two eggs of similar or diffeernt colors. Use a small thingamabobber or just use a Rio Nymph Line with the orange tip. Adjust the weight so the flies don't hang up and they just roll them through the redds.
The redds will be a series of rollers with gravel ridges with drops behind them. Position yourself slightly downstream or directly across from the targeted area. Cast to the ridges with a straight line cast, if salmon are not present, and and lead your flies through with your rod tip leading the way. If your indicator or the end of the line moves, set in a downstream direction. If your flies are running into a pod of salmon pick them up and then move downstream and fish behind them. If you do snag a salmon, shake the flies off as fast as you can. The thing is really try not to fishing amongst the salmon.
Back on my soap box. Please don't wade the ridges of the redds and definitely don't walk through them. End of lecture.
(4) Fishing the Redds with Indicator and Shot.
The alternate method for fishing the redds is to use a small indicator and light shot with a single or pair of egg patterns. You need to adjust you indicator so the distance from the indicator to the shot is equal to the depth of the deepest part of the redd. Any deeper and you will just hang up.
The technique is very similar to fishing the drop offs, the redds are basically a series of small drop offs. High stick the flies through the redds with a minimum of line on the water. Pick up if the rigg hangs up and re-cast.
This method works best on longer salmon redds with less ridges.
Summary
Be careful when fishing and wading around redds. The "Egg Bite" can provide some of the most fun and fast fishing the year.
Surreal Eggs from Iydlwilde
Here's some photo of "Surreal Eggs" that are available from Idywilde Flies

Surreal Egg - Shrimp Pink

Surreal Egg - Steelhead Orange

Surreal Egg - Salmon Egg

Surreal Egg - Peachy King

Surreal Egg - Pink Lady
When the salmon are in the system in seems like the trout and steelhead know it before we do. They just sense the opportunity. When drifting the Lower Yuba I have noticed the trout get on the egg as early as August. There are usually a few "springers" still in the system and the days are starting to get shorter. The fish know its coming.
First a word on Wading Etiquette
For fishermen, fishing the redds creates a dilemma. We'd like to take advantage of the staging of the trout and steelhead, but when fishing with egg patterns, we must stay off the redds. We need to understand that by wading through or on top of the redds we may be destroying the salmon's future offspring. Look before you wade in. If you see bright clean gravel devoid off larger stones, Stay Out! Fish from the shore and cast below spawning salmon to where the trout and steelhead should be. Some people say it's OK to wade the ridges of the redds, but I and many of the guides think it's better not to. It's too easy to push gravel down on top of the salmon's eggs or let the current push you down inside the redd itself. Better safe than sorry.
OK, enough of the sermon, I just stepped off the pedestal.
Egg Patterns
There are basically three main types of eggs patterns (1) Glo Bugs (2) Beads, or (2)Alevin Patterns. The first two are used to imitate the eggs dropped by the salmon and the Alevin is to imitate the hatching fry still attached to the egg, sort of a salmon polliwog. The use of Trout Beads is somewhat controversial, abd has to do with th length that the hook trails behind the egg. I'll get to that in Part 2.
Today in this article, I'm going to focus on "Glo Bugs" and "Pettis" or "Surreal Eggs".
Glo Bugs or Yarn Eggs
 You can tie or purchase Glo Bug patterns in a multitude of colors and sizes. They are tied using egg yarn.
The photo shows a box with every color of the rainbow, This is typical in Alaska, not quite as important here in Northern California. I usually carry about 4 or 5 colors in three sizes. Typically from about 6mm to as 10 mm. I'll usually start with a 8mm egg. The fish can get selective to a very specific color and its a game of experimentation to find out which color works on any given day. The newer the eggs the darker in color.

Some of the popular colors are champagne, peach, salmon egg, Shrimp pink and Steelhead Orange. They are available at almost every fly shop around. You can get tying instructions easily on the web. They are easy and fun to tie. Here's a photo showing some examples.
Pettis and Surreal Eggs
 My favorite egg pattern is the "Pettis Egg". The Pettis Egg is tied with "Cascade" Egg Yarn. If you are going to tie this pattern buy the "Cascade" egg yarn, you will be disappointed if you don't. This pattern is often sold as a "Surreal Egg" which is the same pattern.
I tie the "Pettis Egg in the following colors with Cascade Egg Yarn. Baby Pink, Salmon, Yellow Roe, Champagne, and Flame. You will need to find a dark red or dark orange bead that the yarn is pulled over. These beads are also available from Cascade. The yarn provides sort of a halo around the dark bead. This is what makes it different and special.
Selecting the Right Color and Size
When trying to select the right color and size of egg to use you need to match the eggs of the Salmon in our Northern California Rivers. Salmon enter our rivers and spawn in seasonal waves. A spawning salmon may dig a redd in November, but there may also be drifting salmon eggs that were laid in the gravel weeks before. The trout will have a preference for a certain stage of the egg.
The only way to pick the right egg imitation is by experimentation, although early on the darker shade typically work well. You should carry lots of different eggs and sizes to cover all possible scenarios. Once you find a working solution, you'll need to stay alert because trout may change their preference during the day or on a different part of the river.
Presentation
You can present eggs in 4 basic ways. (1) Dead drifting in runs under indicator (2) High sticking eggs at pronounced drop offs (3) Tight lining through the redds behind spawning salmon or (4) High sticking in the redds under indicator.
(1) Dead Drifting in Runs Under Indicator
For fishing in runs, I'll rigg up with a deep indicator rigg. I'll tie on a 7 1/2 foot or 9 foot 3x leader and place a large thing-a-ma-bobber about 18 inches down from the end of the flyline. Next, I'll tie a tippet knot about 6 feet down from the indicator to hold my shot. Finally I'll extend a 3x tippet to an egg and then trail the egg with a couple of nymphs. This is my basic deep nymphing rigg that I use all the time. The depth is changed by adding or subtracting tippet or raising or lowering the indicator.
Fish it dead drifted from a boat or from a stationary position from shore. The takes when fishing eggs are seldom subtle. This is opportunistic presentation and the fish in the runs often can't resist an egg dead drifted in the water column.
(2) High Sticking at Pronounced Drop Offs.
For fishing drop offs, you want to rig up with shot and indicator and set your indicator to above 1 1/2 times the depth of the run below the drop off. Use enough shot, more than you think, to get the flies down.
You will first be fishing this rigg on a tight line after making a straight line cast and then transitioning to a deep nymph dead drift presentation and finally holding the line and letting the flies swing up in the current.
Look for areas where there are pronounced drop offs of 3 feet or more. When salmon are in the system and moving up stream they often stop and rest at these drop offs. The resident rainbows and trout will be there with them.
Station yourself just opposite the drop off or slightly down stream from it and cast your flies up above the drop off, the cast wants to be more of a straight line cast. Hold up your rod tip to keep as much line off the water as possible and let the flies drop down into the drop. Don't mend when the flies land, just let them tumble down. Make sure you have enough shot to get the flies down deep. There can be takes right as they drop. Watch you indicator and the tip of your nymph line for any movement. Set at anything suspicious.
Once the flies drift down to just slightly below where you are positioned throw a big upstream mend or a stack mend and feed line downstream keeping a slight hook in you line, like a small "C" , and work the water below you.
Once you have dead drifted the flies as far down as is stll manageable clamp off the line and let the flies swing up in the current. This often brings on a strike. Fish it out until the flies swing below you. Let them hang and then re-cast.
Use the Borger Shot Gun method and methodically cover the water working from closer to farther out.
(3) Tight Lining Through the Redds
When the salmon are staged on the redds the resident rainbows and steelhead will often be waiting directly behind them waiting for stray eggs. Steelhead are know to actually come up and bump the salmon trying to shake loose some eggs. The key is to focus on the area behind the salmon. If you try to run your flies through a pod of salmon you will snag the salmon which is illegal. It's hard, but don't do it.
To rigg for fishing the redds with the tight line method you can shorten up your leader, use less shot and shorten the distance between your flies to about 12 to 14 inches. Often use two eggs of similar or diffeernt colors. Use a small thingamabobber or just use a Rio Nymph Line with the orange tip. Adjust the weight so the flies don't hang up and they just roll them through the redds.
The redds will be a series of rollers with gravel ridges with drops behind them. Position yourself slightly downstream or directly across from the targeted area. Cast to the ridges with a straight line cast, if salmon are not present, and and lead your flies through with your rod tip leading the way. If your indicator or the end of the line moves, set in a downstream direction. If your flies are running into a pod of salmon pick them up and then move downstream and fish behind them. If you do snag a salmon, shake the flies off as fast as you can. The thing is really try not to fishing amongst the salmon.
Back on my soap box. Please don't wade the ridges of the redds and definitely don't walk through them. End of lecture.
(4) Fishing the Redds with Indicator and Shot.
The alternate method for fishing the redds is to use a small indicator and light shot with a single or pair of egg patterns. You need to adjust you indicator so the distance from the indicator to the shot is equal to the depth of the deepest part of the redd. Any deeper and you will just hang up.
The technique is very similar to fishing the drop offs, the redds are basically a series of small drop offs. High stick the flies through the redds with a minimum of line on the water. Pick up if the rigg hangs up and re-cast.
This method works best on longer salmon redds with less ridges.
Summary
Be careful when fishing and wading around redds. The "Egg Bite" can provide some of the most fun and fast fishing the year.
Surreal Eggs from Iydlwilde
Here's some photo of "Surreal Eggs" that are available from Idywilde Flies

Surreal Egg - Shrimp Pink

Surreal Egg - Steelhead Orange

Surreal Egg - Salmon Egg

Surreal Egg - Peachy King

Surreal Egg - Pink Lady
Sunday, July 13, 2014
Seal Bugger
 Rickards Seal Bugger Recipe
Hook: 4x - Tie sizes 6 through 10. This version uses a Tiemco 9395, Size 8
Wire: .020 Lead Wire 20 wraps
Tail: Sparse Marabou 1 1/2 times the shank length and sparse. This version Jay Fair's Black
Rib: Copper Wire
Body: Dubbed Seal and African Goat. This version 4 parts Black Simi Seal, 1 part Reddish Brown Simi Seal.
Hackle: Saddle Hackle Palmered. This version, Hareline Burnt Orange Saddle
Seal Bugger Notes:
I've always been a river and stream guy. Whether its floating a river in my driftboat or raft or fishing high back country creeks. My experience with stillwater has been confined to mainly fishing wilderness lakes in Montana and Wyoming where the trout were always willing and would take just about anything you'd throw at them.
It's just this year that I've decided to take up the study and practice of fishing stillwaters. I'll be sharing what I glean along the way.
I purchased Denny Rickards book titled "Fishing Stillwaters for Trophy Trout" years ago and its been sitting in my bookcase for years. I started my learning process by reading and studying it and refreshed his "Stillwater System" which is a team of impressionistic flies for stillwaters whereever you may roam.
One of his favorite patterns is the Seal Bugger. Here is how you tie them.
I tied up some Seal Buggers and picked up this fish on a Black and Scarlet Seal Bugger. They work!

Denny Rickards Seal Bugger
It is recommended to fish larger sizes 6-8 in the spring and then move to the smaller sizes 10 in the fall.
When selecting marabou feathers for the tail don't use the stiffer portion at the top of the plume including the stem. Use the side portions that have move movement.
Check out saddles dyed by J. Fair. They are top quality for these types of flies.
It is important to have the hackle palmered through the body. This will give the fly a breathing motion that you can't get if the hackle fibers face the rear of the hook. With that said, it recommended to tie them both ways and see which way the fish like best.
Real Seal is very hard to find. Arizona "Simi-Seal" is a very good substitute. Jay Fair also makes "Seal Sub" which is very good.
There is a tendency to either under dub or over dub this fly. Strive for a consistent base with the seal fibers standing at a right angle to the hook shank. If it is done right the fibers pulse and seem more alive.
It is recommended to fish the seal bugger with an intermediate line. You can also use a uniform sink type II, a uniform sink type III or a stillwater line depending on conditions. Try retrieves using a long slow pull or a very short rapid pull.
This fly is designed so the tail moves when stripped, the body pulses and the weight will drop the front portion of the fly when the strip is paused.
As another point to remember, the long slow pull with pulls of 20 to 30 inches is a go to retrieve for all types of larger flies that imitate leeches and bait fish.
Denny ties this pattern in 12 variations with contrasting body colors versus the hackle colors.
This is a great searching pattern that also represents a leech or a dragonfly nymph the best. It is also just a strong attractor. It isn't really a bait fish imitation. Tie them up in olives and browns.
Tying Instructions:
1. Place hook in vice and start the thread wrap behind the eye of the hook. Cover hook about 1/8" down from the eye. Tie in the .020 Lead Wire with thread.

2. Wrap the hook towards the hook bend with 20 wraps of the .020 lead. After tying in the lead run the thread to the end of the hook directly to the hook bend.

3. Pick a small bunch of marabou from the side portion of the feather. You want this to be a sparse bunch. This provides more movement of the tail. Tie the tail in about 1 1/2 times the length of the shank of the hook. Tie in the tail, bind it down and clip off the butts of the marabou.
4. Tie in the copper rib at the tie in point at the tail.

5. Tie in the saddle hackle. Select a webby hackle which is typically located near the stem of the hackle. Tie the hackle in by the butts not the tip. Position the feather so it will be palmered through the body with the hackle pointing towards the eye of the hook.

6. Tie in a dubbing loop that is about 6 inches long. Take a blend of Seal's Fur, 3/4's black and 1/4 scarlet/red. Use a coffee grinder to blend the dubbing materials. Place the fur cross-wise into the dubbing loop. Hold the material with your hand to keep the material from spinning and then spin the dubbing loop tool while holding the material. Let go of the material and it will spin itself. Pick out the excess to create a consistent rope. You can add more material below to extend the length of the dubbing rope if you need to lengthen the rope.
7. Once you have the correct amount of material in the rope continue spinning the dubbing loop tool. The key is to have the right amount of dubbing. If you use to much material it will tend to float the fly. Experiment until you get a sparse looking body with the fibers standing at a right angle to the shank of the hook.
8. Spin the loop tool a bit more and start placing wraps one in front of the other towards the eye of the hook. The seal fibers should be standing at a right angle to the hook shank. Wrap the rope forward until you just cover the lead wire and tie the rope off. Clip off the remaining rope.

9. Wrap the copper rib forward, not too tight and wrap about 10 times on a 4x hook. The copper ribbing is not real visible when you are tying the fly, but when the fly gets wet the brass shines through the dubbing. Tie off the wire at the head of the fly.
10. Once the copper rib is tied off use a bodkin and pick the trapped seal feathers out. You want the fibers to be standing out at a right angle to the hook shank. This is also why you don't want to wrap the copper wire too tight. By wrapping it loser, the fibers pick out more readily.

11. Wrap the hackle forward with 4 turns only. More than 4 turns will tend to float the fly. The other reason for only using 4 turns is to create segmentation. It also allows for the hackle and dubbed fibers to move and seem more alive. Tie off the hackle at the head and pick out fibers that have been bound down by the hackle stems. Be careful not to break the hackle stem when doing the final picking out of the fibers.

If the hackle fiber breaks, just tie in another hackle, no big deal. You can also do this is a fish rips it loose. Don't throw the fly away just tie in another hackle.
The finished fly. Try it, you'll like it.
How to fish the Seal Bugger
1. This is best fished with a long slow pull, 20 to 30 inches with the tip of the rod in the water. Try different speeds of the long slow pull until you find the speed the fish like.
2. Another retrieve is the short quick pull, 1 to 2 inch pulls in quick succession.
Saturday, July 12, 2014
The Fat Albert or the Chernoble Juicy Bug

My fishing brain trust, me and my fishing buddies, have been playing around with some dry fly attractors on the Lower Yuba and have been enamored with a Fat Albert type fly. This pattern is also called a Chernobyl Juicy Bug by Umpqua.
Many of the Fat Albert ties are wider and more robust looking. While the Juicy Bug tie is longer and the profile is thinner. You can play around and see what profile the trout in the rivers and streams you are fishing work best. You can play around with the leg colors too.
Fat Albert Recipe
- Hook - Tiemco 5262 - A 2X-long dry fly hook. The long shank makes it useful for imitating hoppers.
- Thread - 140 Denier Black Thread or 140 Denier Brown
- Body: 1/8 Foam, Tan and Brown
- Indicator: White Post Material
- Legs: Round Rubber Leg
Sounds Simple Right? Well let's Tie one up and we'll see.
 Step #1 - Start the thread right behind the eye and make a thread base at least partially down the bend of the hook. Return the thread to within a few eye lengths back from the hook eye.
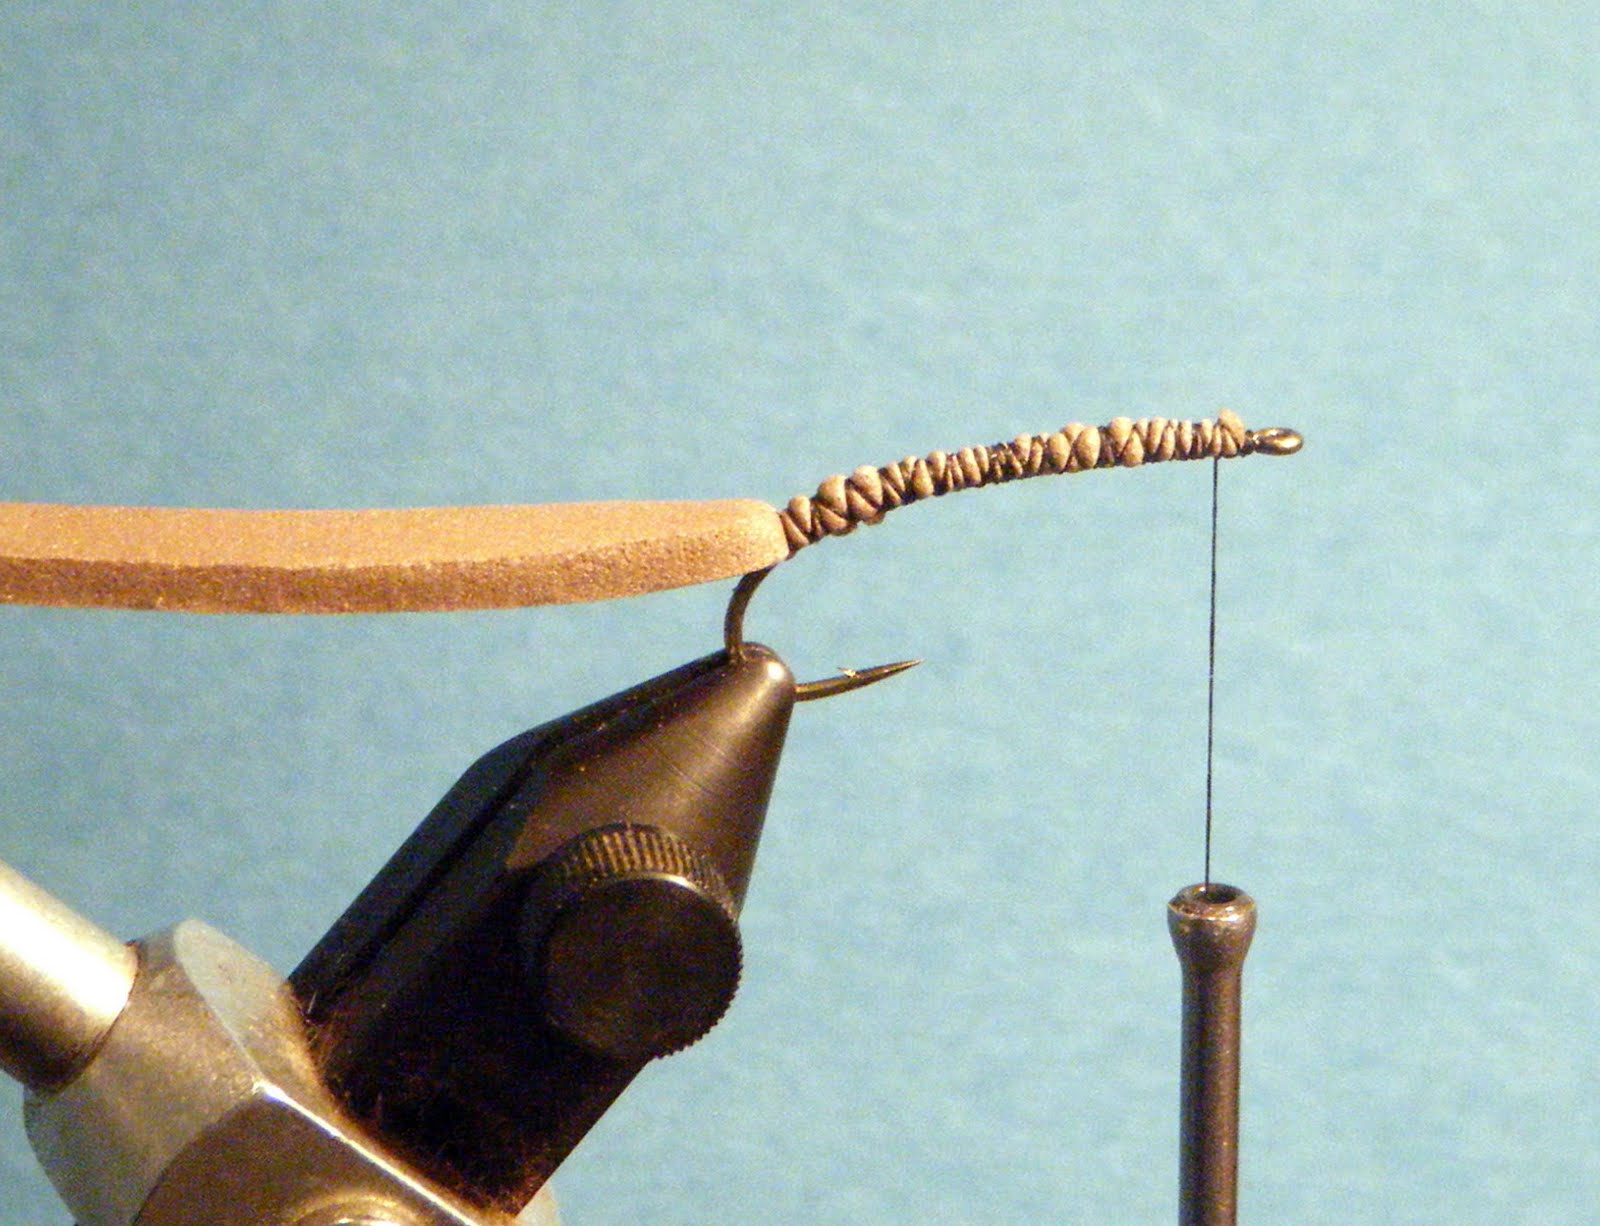 Step #2 - Cut a strip of brown foam that is about as wide as the gap of the hook. This strip should be at least four inches long. Tie the brown foam strip to the hook up near the eye and wrap back over it to the bend.
Step #3 - Continue past the bend a bit to anchor the foam down onto the curve of the hook. Wrap forward again with the thread to the front of the hook.
 Step #4 - Cut a strip of tan foam that is about as wide as the gap of the hook like you did for the brown foam.
Step #5 Tie this tan strip in as you did with the brown foam, at the front of the hook on top of where you tied in the brown foam.Wrap back over the tan strip to the bend. Try to bind the foam down tightly as you wrap.

Step # 6 - Spend as much time as is necessary to cover all the foam on the shank with a nice smooth layer of thread as shown here. Be patient and get the foam completely covered with thread.
Step #7 -Bring the thread to about even with the hook barb and let it hang there in preparation for the next step.
 Step #8 - Pull the tan foam forward and bind it down with two tight wraps of thread at a point about even with the hook barb(or between the barb and the point).
 Step #9 - Lift the foam again and move the thread forward an equal distance. Lay the foam down again and bind down the second segment. Repeat the above process one more time to create three segments that extend just past the halfway point on the shank.
Note - For the Juicy Bug use a longer 3x hook and make 4 segments.
 Step #10 - Pull the brown foam strip over the top of the tan foam segments and bind it down in the last tan foam section.
 Step #11 - Cut a clump of clear crinkle synthetic post materials of choice. Bind it down in that same segment section at the center of its length. You want to use a material that compresses well and will create very little bulk. Less is better.
 Step #12 - Take another tan foam strip (as wide as the hook gap) and tie it down in that same segment (by now you have realized to go easy on the number of wraps for each of these material tie downs...the cumulative effect is plenty to hold everything down but you don t want to make too many turns on any one material to keep the bulk to a minimum)
 Step #13 - Cut the synthetic post material down to a short little puff.
 Step #14 - Now for the fun stuff. Take a length of rubber leg material, fold it in half and tie an overhand knot so the two strands knotted together form a doubled up leg with a knot. Lay the leg alongside the far side of the hook with the knot at the legs right at the end of the foam body.The rear legs are tied in the same spot as the foam pulled forward earlier.
Step #15 - Tie up another double leg with a knot and tie on the side closest to you. Again, the knot the legs right at the end of the foam body.
 Step #16 - Lift all three sheets of foam up and out of the way while you work the thread up to just behind the hook eye.
Step #17 - Lay the first tan foam strip down and bind it in place just behind the eye with a couple tight turns of thread.
Step #18 - Bind the brown foam down on top of the tan foam.
Step #19 - Bind the other tan strip down on top of the brown foam. Try to keep all the strips on top of each other.
 Step # 20 - Clip the front end of all three foam strips just beyond the hook eye.
Step #21 - Tie in a single (un-knotted) strand of rubber leg along the near side of the hook in that front joint.
Step #22 - Tie another strand of rubber leg in along the far side of the hook as well.
Step #23 - Tie another strand of rubber leg in along the far side of the hook as well.
The Finished Product
The finished Fat Albert should look something like this.
Quartering View
 Bottom View

Top View
 Bottom View
Top View
Stillwater Nymph

Rickards Stillwater Nymph
Hook: 2x - or even 3x longTie sizes 10 through 12. He also ties and uses them in sizes 8 and 14. This version uses a Tiemco 5262.
Thread 8/0 Black for weighted. Olive for unweighted.
Wire: Tie this fly weighted and unweighted. Use black thread for the weighted versions
Tail: Sparse Marabou 1 times the shank length and sparse
Rib: Copper Wire
Body: Dubbed Seal and African Goat
Hackle: Saddle Hackle Palmered
Back: Marabou
Stillwater Nymph Notes:
It is said that the Stillwater Nymph is the most consistent pattern that Denny Rickards uses wherever he fishes.
The Stillwater Nymph primarily imitates two food items. A damselfly and a scud.
When thinking about this fly think long tail and short body.
When selecting marabou feathers for the tail don't use the stiffer portion at the top of the plume including the stem. Use the side portions that have move movement.
J. Fair. dyes and sells hackle that is well suited to tying stillwater flies.
When using this pattern to imitate scuds, when scuds are brooding out, their belly sack turn orange. So use a burnt orange saddle hackle for imitating scuds.
When imitating a damselfly tie them in weighted and unweighted versions. When damselflies are about and they are working near the surface use the unweighted version. If not probe deeper with a weighted version.
Real Seal is very hard to find. Arizona "Simi-Seal" is a very good substitute. J. Fair also sells a substitue called "Sub Seal".
It is recommended to use a short slow pull of about 3 or 4 inches at a time or a very short rapid pull. Remember it's the speed of the pull that varies not the length when using the short slow pull. Vary the speed, more than the length.
Tying Instructions:
1. Place hook in the vice and start thread wrap behind the eye of the hook. Cover the hook down from the eye to the hook bend.

2. Pick a small bunch of marabou from the side portion of the feather. You want this to be a sparse bunch. This provided more movement of the tail. Tie the tail in about the length of the shank of the hook. Tie in the tail and bind it down.
3. Once the tail is tied in pull the marabou fibers back over the tail and bind them down, tie back, with thread. These fibers will become the back of the fly.

4. Tie in the copper rib at the tie in point at the tail.

5. Select a feather that has fibers not longer then the gap of the hook. Tie in the saddle hackle by the tip. For this fly you don't want the hackle to be palmered. If you tie the hackle in palmer style the fly will have a tendency to spin.

6. Tie in a dubbing loop that is about 6 inches long. Use Olive Seal's fur for the damselfly imitation. Place the fur cross-wise into the dubbing loop. Hold the material with your hand to keep the material from spinning and then spin the dubbing loop tool while holding the material. Let go of the material and it will spin itself. Pick out the excess to create a consistent rope. You can add more material below to extend the length of the dubbing rope.

7. Once you have the correct amount of material in the rope continue spinning the dubbing loop tool. The key is to have the right amount of dubbing. If you use to much material it will tend to float the fly. Experiment until you get a sparse looking body with the fibers standing at a right angle to the shank of the hook. The dubbing loop for the stillwater nymph should be more sparse that the seal bugger.

8. Spin the loop tool a bit more and start placing wraps one in front of the other towards the eye of the hook. The seal fibers should be standing at a right angle to the hook shank. Wrap the rope forward until you just cover the lead wire and tie the rope off. Clip off the remaining rope.
9. Wrap the copper rib forward, with tight wraps. Tie off the wire at the head of the fly.
10. Once the copper rib is tyed off use a bodkin and pick the trapped seal feathers out. It is not as important to pick out the fibers as much as the seal bugger on this fly. Just pick out enough to remain buggy.

11. Wrap the hackle forward with 4 turns only. More than 4 turns will tend to float the fly. The other reason for only using 4 turns is to create segmentation. It also allows for the hackle and dubbed fibers to move and seem more alive. Tie off the hackle at the head.
12. Pull the marabou fibers from the tail forward over the eye of the hook to form the back. Rotate your vise, if you have a rotary vise, to make sure the back is positioned correctly. Tie off the marabou fibers.
13. Trim the hackle fibers that are sticking out upwards along the back. Trim the hackle fibers along the sides so that the hackle fibers are down and not out to the sides.
14. Whip finish and cement the head.
How to fish the Stillwater Nymph
1. The un-weighted version is best fished in the top two feet of the water column.
2. The Stillwater Nymph is best fished with slow pulls and pauses.
3. You can also use a steady hand twist retrieve. You can pop the fly with a pop on the downward motion of the hand twist retrieve to get a little more lively action.
4. You can also use the short quick retrieve. Short quick 1 to 2 inch strips.
5. Start with the low short pull, switch to the hand twist. finish with the short quick strip. Experiment.
Subscribe to:
Posts (Atom)