Fly Fishing Traditions


Fly Fishing Traditions Blog and Website
"It's about Life & Fly Fishing"

Friday, January 20, 2017

Part 2 - Following the Big Flows on the Lower Yuba River


Old Island Complex Looking Upstream - Photo #1

This is part two of the post dated 01/17/17. The purpose of these photos and notes is to provide  some perspectives as to what affect the extreme high flows of the recent storms, peaking at 85,000 cfs, may have upon the stream bed, trees and the natural environs of the Lower Yuba River

The photo above was taken downstream from the "Old Island Complex". This is just downstream from the area that is known as the "Aquarium". Why the name "Aquarium"? When floating downstream there is a complex of rock formations that have created a run of deep water, in some cases over 20 feet deep. When the river is running gin clear, you can see every pebble on the bottom as the fish as the scurry away.


Back to Photo #1 - The channel of water to the center right is flowing out of the "Aquarium" There is another channel to the left was flowing through but has now stopped. Both channels are trying to cut the corner so to speak. These channels are what we all hope will continue to flow once the river drops to fishable conditions of 2000 cfs or less. My thoughts are that it will not. This complex is a prime example of an area that could use a restoration project. It would require a piece of equipment to do so, as mother nature needs some help.

This area had water flowing through multiple channels years ago before the main channel was scoured deeper. There is too much gravel at the top end of the channels to allow the river to flow down through the area when there are lower flows during the summer and salmon spawning time. They can put equipment to fix Putah Creek, why can't this be done on the Yuba? Maybe a volunteer group of volunteer with picks and shovels good get it to start flowing?


Old Island Complex Looking Downstream - Photo #2

Photo #2 - This photo is taken from the tailout of the "Aquarium" run. At the right the water is running into what is at 5500 cfs, a big bay. The water in this channel is no longer running through. Just to the left there is a channel that is still running through, (see photo 1). Most of the water is running to river left which is shown in the foreground. This continues to run at the highest volume, thus digging the tailout deeper on this side. This will result in the main flow continuing to flow down the main channel at flows of 2000 cfs or less. Thus drying up the other two channels. Back to the way we are accustomed, but not the way we would like.


Miner's Corner - Photo #3

Photo #3 - This run, which is the main channel below the tailout of the "Aquarium", flows into "Miner's Corner". This corner on the left has been dubbed as "Miner's Corner" by Jon Biaocchi, and maybe others that I am not familiar with. It is appropriate as there are often people panning for gold on this corner. This photo was taken when the river was flowing at 5500 cubes and the river is in its normal deep channel. The river hits "Miner's Corner" and then turns to the right to the antiquated "Concrete Diversion Structure". All back to normal.


Erosion at Road - Photo #4

Photo #4 - The road along the run above "Miner's Corner" has a paved road along it. A large portion of the right edge of the road has been undermined. This piece of asphalt is hanging over about 4 feet. This shows the power of the river at the high flows. It takes established trees and shrubs to hold the gravel. Sometimes even that isn't enough.


Run Below Miner's Corner to the Antiquated Concrete Diversion Structure -Photo #5

Photo #5 - The run shown here is right back where it always is found. The gravel bar to the right was completely underwater at the highest flows during the storm.


Top of "Long Island"  - Photo #6

Photo #6 - This photo was taken about 1/4 mile below the antiquated concrete diversion structure just above the top of "Long Island". The flow is divided and is flowing into the main channel on the right and to the side channel at the left. This is back to normal, although it looks to me like the top of Long Island has been eroded back a ways. There is a big pool to the left as the water flows into the side channel.


Pool at Side Channel of Long Island - Photo # 7

Photo #7 - This is a better look at the pool just downstream from the top of Long Island. The high flows carved this out. Water is currently flowing into the pool, dead ends and then dumps off to the left into the side channel. This will get much smaller as the water recedes to fishable shape of 2000 cfs or less.


Middle of Long Island - Photo #8

Photo #8 - At the middle of Long Island the channel is a bit wider and gravel has been eroded behind some of the willows on the main gravel bar. This may stay this way at fishable conditions. Time will tell.


Long View of Long Island - Photo #9

Photo #9 - This is a longer view of Long Island taken about 1/3 down from the top. I appears to me that this side channel has widened and deepened a bit. Long Island was completely under water during the highest flows of the storm. With that said it it back where it normally is.


Bottom of long Island - Photo #10

Photo #10 - The final photo is of the bottom of long Island. It looks pretty familiar but what the structure of the stream bed will be like, We'll have to wait until I can float it once it drops down to about 2000 cfs.

In summary;
  • The photos from this and the previous post were taken from the areas of the river that was accessible by vehicle. 
  • Sycamore Ranch Park and Hammon Grove Park were closed. 
  • The river was flowing at about 5500 cfs on the day they were taken. 
  • The portion of the river where the photos were taken was from about 1/3 of a mile above Parks Bar Bridge to downstream about 2 1/2 miles from the bridge.
  • The photos are meant to open a dialog as to the effect the highest flows have upon the river and its environment. 
Hopefully this dialog may answer a few questions. Time will tell where the fish are.

Clay


Tuesday, January 17, 2017

Lower Yuba Storm - January 2017 - Photo Essay Part One


1/3 Mile Above Parks Bar Bridge - Photo #1

It's January 17th, 2017 and the recent storms have just receded and the combined flows of the Lower Yuba plus Deer Creek is about 5400 cfs. and still dropping. The flows from the previous storms came up as high as 76,200 plus Deer Creek at 9850 for a combined flow that  totaled approximately 86,050 cfs. That is a lot of water. Now that the waters have come down maybe we can see if anything has significantly changed.

There are many conversations going on among fly fishers, guides, conservation groups and the general public about how these recent storms and the resulting high flows may affect the structure and course of the river. I believe that the photos in this post may provide some clues. As a background, I have been fishing the Lower Yuba for over 30 years,been guiding it for 8 years and have been rowing a drift boat or raft on it for the last 15 years. I have been through this type of weather cycle a number of times.

This will be a longer post with lots of photos with commentary regarding the photos. I will probably do two posts to cover this topic. The photos start from a position about 1/3 of a mile above the Parks Bar Bridge and the will end at the bottom of Long Island which is about 3 miles below parks Bar Bridge.

Photo #1 - Taken about 1/3 a mile above the Parks Bar Bridge. (See Above)

The photo at the top of the post was taken from a position that was up stream of the Parks Bar Bridge along the Timbucktoo Road. It shows the view around the corner that is about 1/3 a mile above the Parks Bar Bridge. During the peak flows all of the white gravel was under water, Non of the in stream willows could be seen. Today there is a trickling flow on the left. This is at 5400 cfs. When the flows drop this will probably dry up. The same can be said about the trickling flow to the right behind the willow line. The river is now and will pretty much stay in its normal course.


Old Bridge Rock Plies - Photo #2

The photo directly above was taken from on top of the Parks Bar Bridge looking upstream. The stream is a bit wider than normal and some gravel on the left side has migrated downstream. The launch under the bridge is to the right side. The water is back where it normally is flowing around the center rock pile. We will have to wait until the waters drop to under 2000 cfs to make any final conclusions as to the nature of this run.


Launch Area Under the Parks Bar Bridge - Photo #3

The photo directly above is the launch area just above the Parks Bar Bridge. Prior to the storm there was a large gravel bar just downstream from the rock piles. Most of this gravel bar and some of the willows have been pushed downstream.


Run Directly Below Parks Bar - Photo #4

The photo directly above was taken while standing on the top of Parks Bar Bridge looking west, downstream.. This entire bar was under water pretty much bank to bank at the peak flow of the storm. There is a side channel that is flowing into the main channel from the left. My guess is that this will stop flowing when the water gets below 1500 cfs or so. The river is back in its main Channel. The willow line on the river left side is still there but pretty mangled. The rocks on river right are still there. In the longer distance on river left is where the Army Corp of Engineers placed a large number of log piles. They are all gone.


Log Stacks - Photo #5

Photo #5 was taken when the log piles were placed in the fall of 2016. There were probably 16-20 stacks on this bar. As stated above, they are now all gone.


Single Log Stack - Photo #6

Photo #6 - This is another photo of a single log pile which is typical of the multiple log stacks. they are probably in the San Francisco Bay by now.


Bar Below Parks Bar Bridge - Photo #7

Photo #7 - The sand and gravel bar in the foreground is where one bunch of approximately 16-20 log stacks were placed. In the background you can see a willow line with water running behind it. Will this be flowing when the water drops to 1000 cfs. I hope so, but I have been disappointed in years past. Time will tell. You can see the Parks Bar Bridge in the top right corner of the photo.


Run at Granite Rock Face about 1 Mile Downstream from Parks Bar Bridge Photo #8

Photo # 8 - This photo is taken looking downstream looking at the big Granite Rock on river left and then the run that is directly above the Aquarium. The Aquarium is downstream about 1/2 a mile after the river bends to the left and is not in the photo. There is a big pool on the left just downstream from the granite rock face flowing into a side channel. This is new. The main flow of the river is in its normal channel.


Run Upstream of the Aquarium - Photo #9

Photo #9 - This photo is a closer view of the distant view of Photo 8. You can see the rock pile on river right in the center of the photo. This is the normal rock pile in this run and it is back. It was completely underwater at the high flows. The water in the foreground is spilling into the riffle moving from left to right. This is different. 


New Side Channel Flowing Directly into the Aquarium - Photo #10

Photo #10 is showing the new side channel that is flowing into the top end of the Aquarium.  The water shown extending to the left of photo #9 connects to the water in this side channel. At 5500 cfs the pool is currently receding. There may be a trickle flowing when the water drops to 1500 cfs or less. It may stop flowing. We'll have to wait and see.

Stay Tuned For Part Two


Friday, December 4, 2015

Tale of Two Days


This is a tale of two days on the Lower Yuba river, the "Opener" and the "Day After". The Lower Yuba river above the Parks Bar Bridge opened up on December 1st after being closed for 3 months. The river above the bridge is closed to protect spawning Chinook Salmon. The "Opener" is a much anticipated event that most local fishers have blocked out on their calendars, called in sick or just plain played hooky from whatever they should be doing. In other words there are a typically a lot of anglers on the river. This story is about a bunch of fish to the net on the "Opener" versus "A Few" on the next day. I'm not much of a fish counter so let's leave the counting to that.

Here's how the opening day went. I made it down to the river early with my good fishing buddy "Frank Rinella". We've fished the "Opener" for many years, it's sort of a ritual. Something we both look forward to. We hit the river at about 7:30 and took a survey of the river where we launched the boat. There was a drift boat with two wading anglers in a different run a fair distance above where we were. There were two anglers fishing the tailout of the run we were in. I noticed 2 more anglers hiking upstream. We really had one choice, get it the boat and fish the run right in front of us. This run is known for the spawning beds for salmon just upstream at the head of the run. This run goes from the drop off at the base of the riffle upstream to a nice run that is about 5 feet at the deepest and then tails out. It is about two football fields long. We had about 200 yards to fish for ourselves. Pretty darn lucky.

We had to rig up and get to fishing before the crowd closed in on us. Frank set up a nymphing rig with a Troutbead and a San Juan Worm and startted fishing. I had to put my rod and reel together and get set up. Franks was into fish immediately. It took me 10 minutes to get rigged as I kept getting distracted netting his fish. As far as my rigging up I really had a couple of things I could do, but there were salmon beds upstream and a few salmon in the riffles splashing around. So the choice was obvious to me. My Egg Rig!

I tied up a three fly rig. I started with a 9 foot 3x tapered leader, extended with 3x Fluorocarbon tippet to a painted Troutbead, natural color. I tied another 18" piece of 3x Fluorocarbon and tied on a black rubberleg stonefly, I then added another piece of 4x fluorocarbon and added a size 18 Flatulator, (BWO). When all tied up the flies are about 14" to 16" apart. I then placed two decent sized split shot at the first tippet knot above the Troutbead. This is sort of my standard rig for fishing the runs below most any spawning beds. The egg goes closest to the leader, followed by by an attractor and then a imitative mayfly on the point. I mostly fish this rig without an indicator and just stay tight to the flies. I often add an indicator to the rig but I typically start out "Tight-Lining".

Once I got rigged up Frank took a break and watched me fish. I had similar luck. We fished this run and found a bunch of willing fish. They slashed at the Troutbeads at will. Quite a pod of fish. They averaged about 12" to 13". 3 out of 4 took the beads, I caught 2 on the Stonefly, Frank caught a couple on the San Juan Worm. Not one on the mayfly. The fishing was fast until the sun rose over the ridge and shined on the river. It slowed down almost immediately. Not that it stopped, it slowed down. We fished this run and headed downstream in the boat. The rest of the day turned into a fish here and a fish there and then shuting down at about 2:00.

The summary for the "Opener" was great, a bunch of fish to the net, mostly in the first 2 hours,  mostly about 13" (the largest about 15"-16", mostly on Troutbeads. Fishermen all over the place and hard to find open water.

So on to Day Two. Frank and I decided to come back the next morning and fish until about noon. Basically start at the same spot and get there about a half hour earlier. We expected the crowd to thin out considerably and not be as crowded as the "Opener". We got there as planned, rigged up pretty much exactly as the day before. No one on the river. We had the river to ourselves, at least early on. We started with high hopes, we fished the same run as the day before, we got our clocks cleaned. Not a bump. This was after changing rigs, flies, techniques the works. We could not buy a fish. (actually 1). We took our lumps and headed down stream. The count for the half day was three. Three is easy an easy number to keep track of. A Bunch is hard.

So, the tale of two days, A bunch to a couple. I guess that's fishing, it's also about sore lips and  fishing pressure!

Friday, October 23, 2015

Trinity River Steelheading

I had the chance to fish the Trinity River a while back with my long time friend Blake Larsen and another old friend and guide Mike Hibbard. Mike typically guides the Trinity from mid September through January or February every year. He is one of the most respected guides on the Trinity River. We had a great couple of days to say the least.

Here is a video of our trip with Mike Hibbard. Thanks again for being the quintessential steelhead guide. You can contact Mike at www.mikehibbardflyfishing.com

 
Trinity River Steelheading from Clay Hash on Vimeo.

Thursday, September 17, 2015

Which Stance for Fly Casting

The stance you use for casting can influence the movements that follow, such as how you move your casting arm and add force with your shoulder and body.  As with grips, each stance provides somewhat different advantages and disadvantages.


The Squared Stance


When starting from square one with beginning students using a squared stance, facing the target without dropping either foot back is a good idea. Why? The biggest advantage of this stance is its simplicity in relationship to the alignment of the casting arm.  Without moving your body, you can easily attain an elbow-forward arm position throughout the casting movements.  Such simplification of primary movements is important in achieving the consistency for which we strive and a building block for good form. Once good form and timing is achieved the squared stance is the preferred stance.


The Casting Side Dropped Back Stance


Another good option is the casting side dropped back position. This is often the second step for beginning casters once they have their elbow- forward arm position form down. If right handed, you drop your right foot back, as if preparing to throw a ball. It is recommended to start the students with the casting side dropped back 45 degrees.  The main advantage of this stance is in developing timing.

With the casting side dropped back position you are able to watch your back cast to see when to start the forward cast.  One thing to watch out for is that this stance may lead to rotating that side forward during the forward cast. This additional body turning sometimes rotates a caster’s arm and fly rod out of alignment, thus angling the fly line away from the intended direction. Having to realign your arm and rod for the forward cast can also complicate the movement, particularly if using an elbow forward half-throwing motion. So be aware and don't lose good form.

Although timing can be taught in various ways, it is said that most students, in fact, do learn timing best by turning to see the fly line straightening in back. However, it is probably best to have them drop the casting side back just enough to see the back cast, a peak so to speak, then return them to a squared stance when the timing has been corrected. Remember turning to watch a back cast is usually done when practicing, and seldom done when we’re out fishing.  I heard the expression. “Watching your back cast is bad form, except in bear country”.


If you’re casting a slow full flexing action rod, like a bamboo or older graphite, opening up your stance can be used with a lengthened hand movement for better form. 


How About the Stance for Long Distance Casting?


When it’s time to start practicing long distance casting it’s time to go back to dropping the casting side back.  Watching the loops coming off the rod tip on a back cast is the best way I know to learn how and where to stop the rod butt to form small loops in a long line on the back cast.  By this time, arm alignment should be fairly well ingrained.  This open stance offers another distance advantage, inviting long hand movements for a wider casting arc.


The Casting Side Forward Stance

Occasionally I’ll see a person casting to a specific fish and attempting to get a really accurate cast, using a stance with the casting side and foot forward, rather than back.  It is said that turning the casting side forward enhances accuracy by bringing the hand and arm that directs the cast into closer alignment with the eyes and the target.

Summary

It’s not a bad idea to start students with the grip and stance that works best for most people.  If you are a beginner, try the squared stance, with your thumb providing support behind the forward cast.  If you find yourself having trouble with timing, drop your casting side back enough to make it easier to watch your back cast.

If you are more experienced, I would encourage you to experiment with these grips and stances, considering the trade-offs in each change you make. Perhaps you will find something that works better with your cast than what you have been doing.

March Browns on the Lower Yuba

The March Brown Mayfly is sort of a ghost hatch on the Lower Yuba. some years you'd never know they exist and the next year there they are. This is one of the years that they are happening. How do we know. The best indication is when you spot clouds of dancing male march brown spinners hovering over the water. They are the big ones. The females are smaller. You will often see these spinners bouncing above the runs. The females The spinners that you see hatched a few days earlier.


The duns hatch and hang around the bushes and trees for a few days and then they molt into sexually mature spinners.  Their colors darken, their wings become much clearer and in the case of the males their tails and forelegs elongate. They mate and the females return and drop their eggs.

March Brown Nymphs

The march brown mayfly typically arrives with the onset of spring. It is a "clinger" mayfly and clings tenaciously to rocks in the fast water. Does the name march brown mean that the fly hatches in March, not necessarily. In our river it is more of an April event and the conditions need top be just right. Big spring storms with high flows happen and you'll never know there are march browns in the river.


In our river the march brown nymphs are very dark brown and almost black. That doesn't mean that they are available to our trout very often. They have the ability to cling to rocks like no other. They also tend to hide under and in the crevices during daylight hours. They venture out at dark They are adapted to stay out of harms way. But when the nymphs become mature they sport large dark wing pads they start to get restless as they begin to contemplate emergence. They start to migrate to slower water along the edges. Guess what, they loose they foothold and end up in the drift. This is when fishing march brown nymphs are the most effective, basically prior to emergence.


Poodle Sniffer - Black Caddis


Here's another fly tying video tying the "Poodle Sniffer" pupa to match a Glossoma Caddis

Black X-Caddis

Here's video from Blu Ribbon Flies on how to tie a Black X-Caddie

Kingfisher Drift Boat Build - Varnishing

Well, I've got the boat flipped back right side up and back in the paint booth. I've been taking a break from the boat for the last 3 weeks or so as I built a pole barn/shed out behind my shop. My brother Craig and his wife Toni came out and helped me build it. The weather in Idaho had shut him down so they came for visit and gave them a job helping me. I'll have a post about that process on another day.

So, right now I'm about three quarters of the way to a minimum of six coats of varnish to apply to all exposed wood parts on the boat. Ugh! I'm four coats into it and all I can say is you have to be patient and take your time. You can't be in any hurry. There's lots of prep, masking and sanding to the process. But most importantly, is the actual technique involved with the applying of the varnish.

Preparation

The first thing I had to do was to mask off the painted sides. I purchased a special 3M Scotch Blue Painters Tape for Delicate Surfaces #2080. This tape can stay in place for 60 days. I used this to mask a line right under the gunnels. I then used  48" painters masking plastic and taped it to the 1st layer of tape at the gunnels. This protects the entire paint on the exterior of the boat.

I next masked of the interior floors areas and sides that are painted with Durabak truck bed liner. The tape doesn't stick real well to the Durabak but I did the best I could.

Sanding

The Process. All the mahogany and oak parts on the boat have been coated with at least 3 or 4 coats of epoxy prior to starting the varnishing. The varnish job will be a minimum of 6 coats. I will work towards applying the initial 4 coats of varnish which will provide a solid varnish base coating. Once the 4 coats are applied I will need to do a real complete sanding of everything to make sure the surfaces are flat. It is necessary to wait for this heavy sanding as you need enough mil thickness to accomplish the flattening. Four coats should do it. Once the flattening sanding is done, I need to put on at least 2 or 3 finish coats of varnish. Sound pretty simple hey?

The initial sanding prior to the first coat of varnish and the next four coats is done using 220 grit sandpaper and/or a Scotch-Brite pad. I used 220 grit with a sanding block on the flat surfaces and the Scotch-Brite pad on the curved surfaces. I used the sanding block with the Scotch-Brite pads where I could.

Scotch-Brite pads come in various grits. I have primarily used the red pads (Fine about 300 grit). The Grey (Ultra Fine about 400 grit) will come into play on the final two coats. The sanding between the coats is mainly a scuffing to bond the next coat.

Sanding Reality - The main thing I have learned at this point is how the temperature of your workplace really affects the process. My shop has been getting down to about 45 to 50 degrees F at night. I keep an electric oil heater going in my finishing booth days and nights and have been able to maintain about 55 to 60 degrees F in the finishing booth. The main thing that the lower temperatures does is to delay drying time. The lower temperatures really only effect the time it takes to dry. My drying times between coats is running about 48- 72 hours. To be really dry it needs 72 hours. When is it dry enough?

Good question. You can "Hot Coat" varnish coats if the varnish is still soft without sanding. Sounds good doesn't it. I have been doing a sort of in-between. Let's call it a "Warm Coat". I've been letting each coat dry for about 48 hours and then using the 220 grit with a block to knock down the "nibs' and then block sanding with the red Scotch-brite pad. At 48 hours the coat is still soft enough the it clogs the sandpaper, but works well with the Scotch-brite pads.

To be able to sand with sandpaper the varnish needs to be hard enough to create fine dust and not clog your paper. In my case this will take a minimum of 72 hours, maybe longer. Being I am currently at my fourth coat I'm letting the 4th coat completely dry before sanding it flat.

Varnishing

Let me just start out with, "Varnish is intimidating as hell". There are hundreds of articles on the web with horror story after horror story about applying varnish. There are 4 important rules for varnishing that I have gleaned from the web and from to talking with experienced painters. Here they are and believe me I learned them the hard way.

(1) How you treat the varnish in the can
(2) How you get the varnish out of the can
(3) The brush that you use
(4) Your brushing technique

How You Treat the Varnish in the Can

Don't shake varnish! Varnish should always be stirred, stirred slowly enough that you don't whip it into a froth. If you shake the can or stir too vigorously you will be incorporating air into the varnish. Air in varnish is bad. You must stir varnish if you are using satin varnish as it has flattening agents that must be thoroughly incorporated.

If you are using gloss varnish you do not need to stir the varnish other than to incorporate added thinner.

Decant Varnish into a Smooth Sided Container

Do not apply varnish directly from the supply can. If you dip the brush into the can and then "scrape off" the excess on the lip of the can you will send a cascade of frothy varnish back into the can. This froth will be picked up with the next brush load, carrying a cargo of air bubble to your varnished surface of the wood. Transfer the varnish from the can into a smooth sided plastic container.

Thin varnish prior to application. I learned this the hard way. Thinning a newly opened can is impossible since there is no room for the added volume of thinner. Further thinning in the can is subject to inaccuracies since you can't easily determine how much varnish remains in the can. Only by decanting the varnish into a separate container can you accurately add the appropriate volume of thinner. The first coat of varnish should be thinned by 20% to 25%. (This does not apply if you are applying varnish over sanded flattened and epoxied wood.) Subsequent coats should be thinned by 5% to 10%. Thin after you have decanted the varnish into the application container.

Remember, the whole point of thinner in varnish in the first place is to make it easier to spread. The varnish needs to be thinned to adjust flow-out to current temperatures and humidity conditions.

By thinning varnish you are simply adjusting the viscosity of the varnish. Added thinner makes the varnish easier to apply by reducing the viscosity so that it will flow out and level better, thus allowing air bubbles to float to the surface and pop before they become encapsulated in the curing film. Brush marks will also level faster when the varnish is properly thinned.

One thing that lower temperatures in my shop contributed to is a thicker application of varnish. It has made keeping a "wet edge" difficult. I placed my can in hot water prior to starting but it just doesn't stay warm enough. Thinning will help solve this problem.

Use a Natural Bristle Brush Made for Applying Varnish


A varnish brush should have a good "reservoir" so as to allow you to "flow-on" a good quantity of varnish before you need to return to the container for more. Here's a contradiction to what you may hear. Never use a synthetic bristle brush or a "foam brush", or a paint pad.

A good test of a proper varnish brush is to dip the very tip of the brush into mineral spirits. If the brush wicks the mineral spirits up into the bristles, its a good brush. A "Badger Hair" brush is often recommended.

Brushing Technique

The brushing technique is very important. The varnish should be applied by "flowing" it in one direction. Never brush back and forth! If you are right handed begin at the left of am imaginary area about 12"  to 18" square. Make a single long stroke from top to bottom (across the grain). of your imaginary square applying light to moderate pressure. The bristles of your brush should flex slightly. They should not bend to the ferrule of the brush. Then, returning to the top of your initial stroke and using the same brush stroke, begin to drag from the top down. Once you have filled in your imaginary square, brush from right to left. from the dry to the wet (with the grain) to smooth and flatten the varnish.

Move the brush slow enough so as to not incorporate air bubbles into the finish. Continue in slightly overlapping pattern of brush strokes until you have covered the area. Tipping off in this fashion further levels the varnish and breaks any air bubble that may have become trapped in the finish. Again move the brush slowly. Brush only with the tips of the brush.


Chironomid 101 - Part l - Chironomid Facts and Tips


As they used to say in the TV show Dragnet. "Just the facts, Maam" Here's some Chironomid facts and Tips to get us started with Chironomid 101. It's an introduction to this important stillwater bug.

Chironomids are the food source eaten more often than any other. I attended Phil Rowley's Stillwater Scholl where he compared them to M&M's. You put a bowl of M&M's on a table and you just grab handfuls and keep eating. Trout do the same when they feed on chironomids. Let's look at some facts about chironomids.

Seasonal Availability


  • Larvae are available all season long, 12 months of the year
  • The emerging pupae and adults are available two times a year. They become a main food source for stillwater trout in;
(1) April through June
(2) August through October

  • With that said about the pupae, chironomid larvae or "bloodworms" are available for trout all year long and are a main food source for all stillwater trout all year long.
  • Bloodworm patterns are a good choice during low light conditions and after recent windstorms.
  • Chironomid Pupae patterns can also be used throughout the season as they have elongated emergence cycles. Trout will often take chironomid pupa patterns regardless of the season.
Fishing Tips for Chironomids
  • When trout are found in water 20 feet or less, use a floating line and slip indicator. Start with suspending the flies one to two feet off the bottom. make sure you are just above any weeds.
  • Experiment by moving the fly up one foot at a time to locate feeding fish. Sometimes 6 inches can make a difference.
  • In water 15 feet or less also try using use a floating line and a long leader. This is called the "Naked Technique". Use a fly line like the Rio Indicator Line that has a orange 18" tip which will be your indicator. Takes will be seen as a movement by the orange tip rather than felt.
  • When using the "Naked Technique", your leader should be 25% longer than the water is deep.
  • When using the "Naked Technique" you must balance 4 variables.
(1) Leader Length
(2) Retrieve Speed
(3) Pattern Weight
(4) and the time to allow the pattern to sink
  • Wind drift larva and pupa patterns by quartering across the wind and allow the ripple to swing through the water column. Watch the orange tip of the fly line for any movement.
  • When fishing for chironomids in water over 20 feet deep use a full sink line, a type VI or VII and retrieve the fly vertically through the water column. Cast only the amount of line and leader as the water is deep. Count the flies down and use a shorter leader.
  • Remember that when presenting imitations for the chironomids larva and pupa, the retrieves must be so slow that they are almost static.
  • When fishing on the surface, pay attention to whether the trout are taking skittering or stationary adults. Present your flies accordingly.
  • When trout are taking chironomids on the surface consider using a soft hackle retrieved slowly through the area of rising trout.

Chironomid Larvae Patterns

Size - 3/8" to 1" - Hook sizes #8 through #16 - A size #12 2x long is a good average size larva pattern

Shape - Slender, segmented and worm-like

Color - Many species are able to generate hemoglobin in order to survive in oxygen poor conditions.
  • As a result scarlet red or maroon coloration is common.
  • Larva can generate hemoglobin as conditions dictate which affects coloration. Candy Cane schemes of red and green are common on some lakes.
  • Olive and bright green are other common colors
Chironomid Pupae Patterns

Size - 3/8" to 1 inch, hook sizes #8 - #18
  • Chironomid tend to be larger in mud bottomed, algae type lakes. Sizes #12-#8
  • In clear water lakes, Chironomids are smaller $10 -#18
  • A #12 is a average pupa size and a good place to start.
  • If trout do not appear to be selective to size try using one size larger so your fly will stand out from the naturals.
Shape - Comma-like shape.
  • Many pupa patterns use scud pupa hooks to suggest the profile
  • Most patterns have a bulbous thorax, slender segmented, tapered abdomens
  • In clearer water or on lake with much angler pressure consider using slim realistic patterns.
Colors - Black, maroon, brown, olive, shades of green, tan.
  • On dark days, use dark patterns.
  • On bright days use bright patterns
  • Pupae use trapped air and gases to aid pupal ascent and the adult transformation. This gives pupae a distinct silver glow.
  • Pupae can change color as they absorb or replenish trapped gases
  • Chironomids pupae have prominent white gills. The Chaoborus pupae do not.
  • Use Super White beads in algae stained waters. They tend not to fouls as much as synthetic or natural materials do.
Chironomid Adults

Size - The adults are smaller than the corresponding pupa.
  • Sizes #10 - #16 covers most adults
Shape - Similar in look to adult mosquitoes.
  • Chironomid adults do not bite like mosquitoes.
Color - Colors mirror those of the pupa. recently emerged adults are bright. Their body color darkens once it hardens.

Tuesday, May 5, 2015

The Kingfisher's First Float


Well, after 7 months of dedicated work, countless hours of sanding and layers of epoxy and marine spar varnish, I was able to find out if my new handmade drift boat floats. It did, and it did so better than I had dreamed of. Let me explain. I had a few concerns prior to launching the "Barca de Trucha", (Trout Boat). Little nagging questions.

First, the boat is 17 feet long from the bow to the stern. This is about 18" longer than my Hyde Low-Profile. It is also wider by about 6 inches, I was concerned that it would be a little to big for the Lower Yuba. An air craft carrier in a small bay so to speak. It isn't. It floats like a leaf, lighter and more responsive than my Hyde. Being so, makes it feel smaller, I always referred to my Hyde as a sports car. Nimble and quick to the response of the oars. The "Barca" is just as quick if not quicker.

Second, it seemed to be a work of art more than a working drift boat. Once I floated it down the river it just felt right. It will be a working drift boat come what may, scratches, dings, scrapes, it will be a fisher.

Third, Rope Seats? The rope seats look real cool, but what would they feel like, Uncomfortable? Pinching your rear? Well, definitely not your padded plastic seat. They felt fine. I wore lightweight shorts and was comfortable. The ropes will need to be tightened until they stretch out properly, but other than that definitely a passing grade.

The first float came with a sense of pride. Every piece of wood, every screw, every coat of epoxy and varnish was placed with care and thought. There is a sense of pride that is sort of like catching a fish on a fly rod you've built with the fly you tied. Now I can add "the boat I built". I've always been a craftsman and this is just another extension of that. I take pride in what I do, I do was I say, I keep my word and promises. My Mom and Dad raised me that way. This is just another mission accomplished, a plan come to fruition. I thank my Mom, Geri, for encouraging me to pursue my passions. This is is just who I am.

I am looking forward to many years of fishing in this new boat and coaxing many fish to the net. More stories, more time with good friends and family on the rivers of the west. It was worth all the time and effort! No regrets!

Photos from Launch Day


Ready to Head down the River


Ist ferry across the riffle


Zack the Photographer


My lovely wife, Laura, enjoying the inaugural float


Running a Chute


Zack getting ready to take the plunge


Taking our time down the river


Zack, Thanks for your help and encouragement along the way!


Made it to the takeout with nothing but smiles!


Monday, April 20, 2015

Kingfisher Drift Boat Build - I'm Done


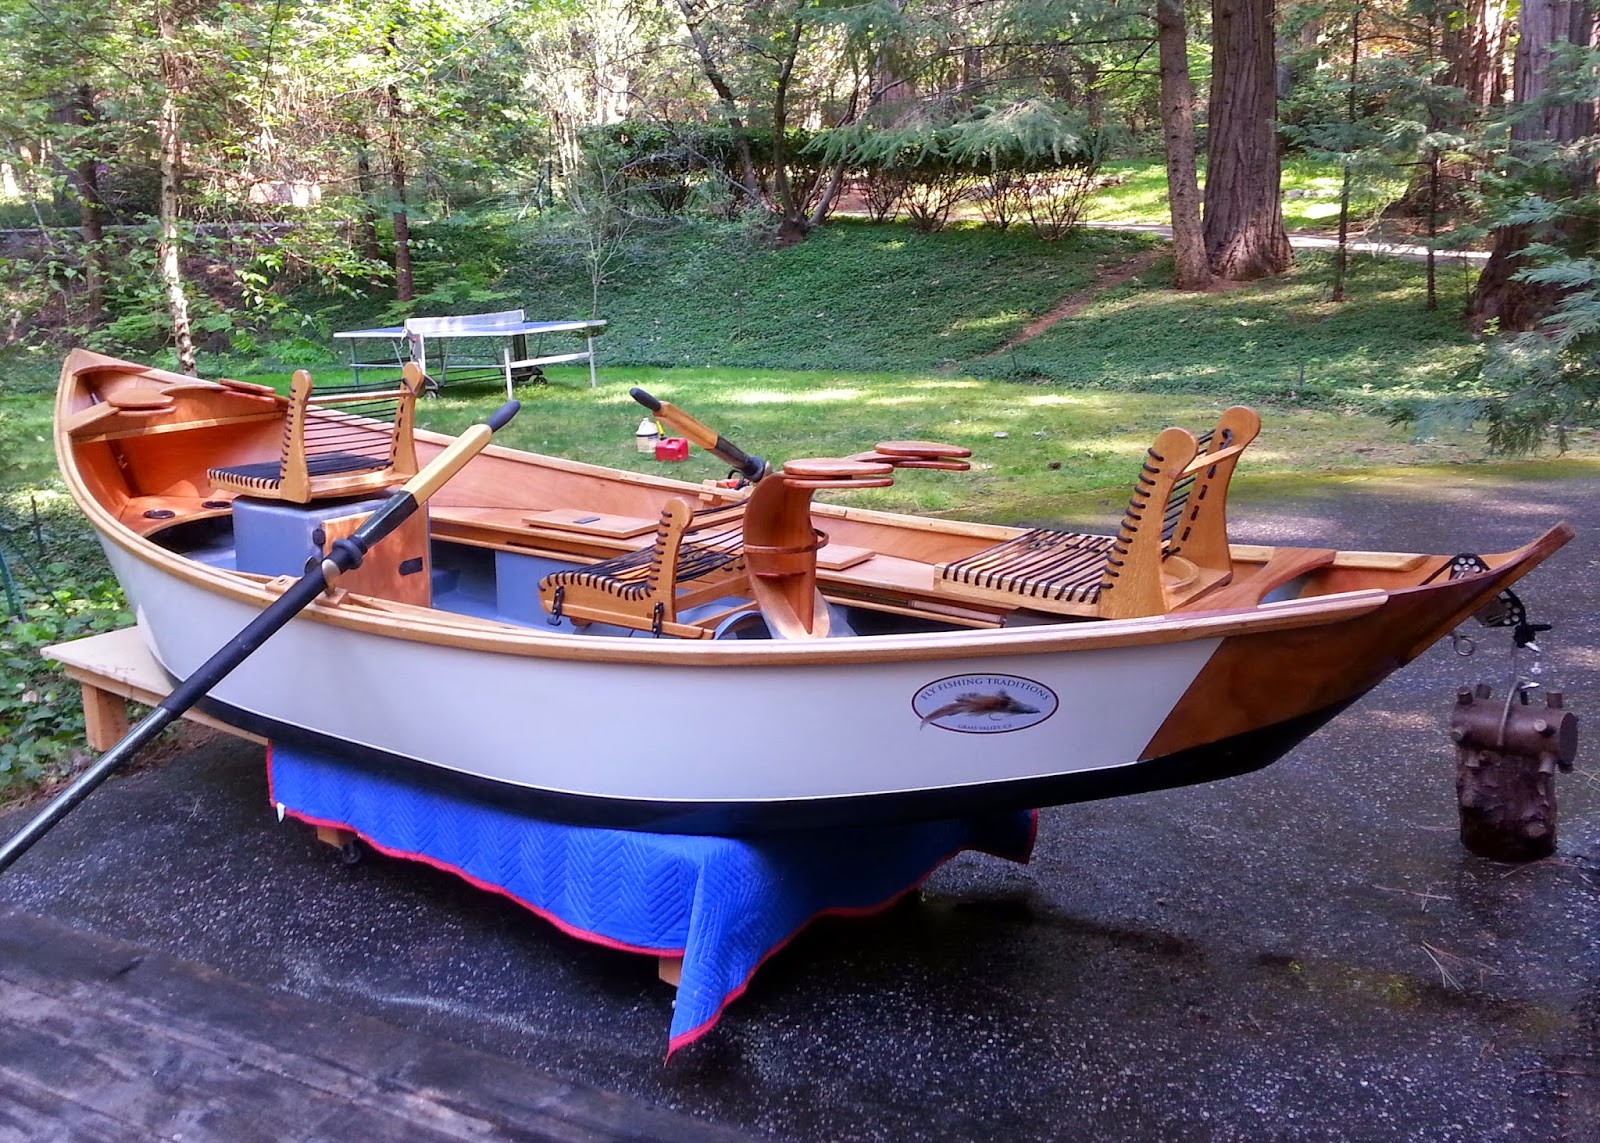
I started the "Kingfisher" build in September of 2014. Today is April 20th, 2015. It's been quite a journey. I purchased the plans from Jason Cajune and they were worth every cent! The varnish has been curing and hardening for about two weeks, The build has taken me about 7 1/2 months, not bad from what I've heard. This includes 3 weeks off to build a pole barn/garage, so the actual build time was a more like a strong six months. I have probably averaged about 40 hours a week, so I've got something like 1000 hours into it, but who's really counting. My trailer should be arriving next week, so the trip to see if it floats is about a week away. 


Photo Gallery of the Kingfisher


The finished boat is 17'0" long. It has a beam of  6'6". The width at the bottom is 4'10". It should float high and dry and be real stable.


I had a decal made with my "Fly Fishing Traditions" logo imprinted on it. The sides are 3/8" Okoume plywood that have about 3 coats of epoxy and layers of fiberglass cloth. The main body of the boat is painted on the outside with "Blue Water Marine Paint". It is a silicone copolymer topside enamel. The color is "Super White. The bottom and 4" up the sides at the chines are coated with "Linex" bedliner, smooth Black. The gunnels are black oak with 3 coats of epoxy and then 6 coats of flat "Last n Last" satin varnish.


The transom is "Rounded". Constructing the rounded transom was the most intimidating part of the construction. My plans had a squared off transom so I had to figure this out myself. It was bent around a form using 3 layers of 1/8" Okoume plywood. The rounded transom has 3 coats of epoxy and 6 coats of varnish. It turned out great!


The interior of the boat has decks and sides of Okoume mahogany plywood. The rowers seat and the fore and aft seats are made from white oak. The floors, dry boxes and the lower portion of the sides are coated with bed liner that was applied with a roller. The oars are Sawyer square topped counter balanced oars,


The fore and aft seats are made with white oak. The base of the seat was steam bent using 3/16" x 2 1/2" strips. The seats have 2 coats of epoxy and 6 coats of varnish. The rope for the seats are 3/8" diameter double braided poly. The seats are mounted on "Springfield" swivel bases with a bracket that allows them to be removed.


The rowers seat slides in a track and can be adjusted forward and backward. Rubber retainers hold the rowers seat in position. The deck in the background has a dry storage box that is accessible by opening the hatch doors. There are dry boxes on each side.  


The rear knee brace is made by laminating 3 layers of 1/8" Okoume mahogany plywood. I constructed a steam box to steam the plywood and then placed them in a plywood form to conform to the desired shape. I call it a "George Jetson" knee brace. There are two cup holders integrated in the middle section.


At the rounded transom there is a wooden plate with a handle integrated into it that reinforces the transom and is where the anchor rope runs through the hull. There are two pulleys that are lined up with the hole that runs through the transom that guides the anchor rope.

There are 4 hatches that access the dry storage boxes. two at the starboard and two at the port side. The dry boxes ate about 5 feet long. The cup holders are sealed t keep the dry storage boxes dry. The foot rest for the rower is adjustable to 4 different positions. There are two positions for the oar locks.


The front seat has a large pedestal with storage underneath. You can see the circular lamination of the seats. There are two cup holders tucked up in the bow section. There is a triangular casting deck to catch your fly line when you are fishing.


An ice chest fits snugly into the pedestal under the front seat.


There are rod holders tucked under the main deck on each side, starboard and port side. You can store two rods on each side for a total of 4 rods. This is a spey rod broken down in half. The rod holders will take 10 foot rods fully assembled.


All I need is a trailer and it will be a fishing machine. Can't wait!!!