Fly Fishing Traditions


Fly Fishing Traditions Blog and Website
"It's about Life & Fly Fishing"

Sunday, August 31, 2014

Kingfisher Drift Boat Build - Kevlar and Glass on the Inside of the Bottom

Now that I've got one side of the bottom of the Drift Boat covered with Kevlar and Fiberglass, I've got to flip the Plascore bottom over and do the inside. This is the side of the bottom that I'll be walking on and constructing the seats, storage etc.


The process is similar except I'll need to "Pre-Bend the bottom so that when the Kevlar and Fiberglass are applied the boat will cure and harden in a curved shape. The reason that this is important is that it will keep the inside surface of the bottom from puckering when the boat is stitched together since the inside surface will be in compression.

The side of the bottom that has just been glassed will face down and both ends of the panel must be raised 6-8 inches. I raised the bow 8" and the stern 6". I used chunks of 4x4 material placed underneath to achieve the lift at the bow and stern. I then took fender washers and used screws with finish washers to keep the middle section down and pressed against the plywood table. I used 4 of these washer hold-downs, 2 on each side.

Once this was set up I just repeated the same process as I did on the other side.

Construction Sequence Photos


This photo shows two 4x4's under the bow section for a lift of about 8"


Here I used a single 4x4, but scooted it in to achieve a raise of about 7"


I used a fender washer with a screw and finish washer to hold the center section down against the table. I used a scrap of Plascore to insure I had even pressure down to the table. I located these "Hold-downs" about 3'6" back from the bow and stern.


Here is the finished bottom with the finish hardened and the edges trimmed.

Next Up - Finish Sanding the Side Panels


Saturday, August 30, 2014

Kingfisher Build - Laying Down Kevlar and Fiberglass on the Bottom

Laying Kevlar and Fiberglass on the Bottom


The Kingfisher is designed to have a 38" strip of Kevlar right down the middle on both the outside and the inside surface of the Plascore Bottom. This leaves about 10 inches on each side. It gets one full width layer of fiberglass and then in addition, 10 " strips on each side to reinforce the edges. When you put Biaxial Fiberglass tape on the chine you essentially have 3 layers of fiberglass on the edges. This layering happens on the inside and the outside of the bottom.


So a Simple Outline of the Process is;


  1. Pre-cut the Kevlar and Fiberglass mesh.
  2. Lay down a tack coat of epoxy and the lay up the Kevlar. 
  3. Lay a flow coat of epoxy over the Kevlar and lay down the 60" wide layer of fiberglass.
  4. Flow coat the fiberglass to fill the weave.
  5. Lay down 10" strips of  fiberglass on the edges to reinforce the outside edges.
  6. Flow coat over the 10" strips.
  7. Let this set up overnight and do the same thing on the other side.

There will be one 38" wide piece of Kevlar down the middle, one full width piece of fiberglass and strips at each side of the Kelvar to reinforce the edges. These strips will be approximately 10" wide. (57" - 38" =  9 1/2").  This makes up the thickness where the Kevlar doesn't reach the sides and adds strength.

And the More Detailed Explanation;

The Kevlar 


The first piece to go down is the Kevlar. Kevlar has a lighter specific gravity than epoxy  which means it will float in the epoxy. This is not good. In order to solve this issue, a tack coat of epoxy will be laid down on the Plascore bottom. A flow coat of epoxy will be laid down and then once it tacks up the Kevlar cloth will be laid down.

Kevlar Step by Step
  • Prior to laying down the tack coat, roll out the Kevlar on the dry Plascore bottom and cut it to length. The Kevlar will be approximately 12' long. Place the Kevlar centered on the sheet in both width and length. Don't cut the Kevlar to the approximate shape, just plan on letting it hang over the edges as it is applied. I made that mistake on the bottom side.
  • When the Kevlar is in position, make register marks with a permanent marker at the sides and the ends for reference. This is very important because once the tack coat is applied the Kevlar must be placed exactly and carefully where it belongs. Having help to lay the Kevlar is a great idea. I did it by myself and it was a PITA.
  • Carefully roll the Kevlar back up on a cardboard tube. Keep it tightly rolled as the will greatly help when rolling it back out on the tacked up Plascore. This was my lesson learned for the flip side.
  • Now it's time for the "tack coat". Mix up about 24 ounces of epoxy. I'd advise doing batches of 12 ounces each. You can apply the epoxy with a foam roller. This will spread it evenly. Basically like doing a "flow coat".
  • Make sure you overlap the register marks by a couple of inches.
  • This coat must "tack up". It should take about an hour at 60 degrees, more if colder, less if warmer. It should be sticky enough to grab a finger on your rubber glove.
  • Carefully unroll the Kevlar down the length of the bottom. Try to lay the Kevlar along the register marks. Try to get it as straight as possible but it is more important that there are no bubbles underneath. This the PITA part.
  • Smooth it out with your gloved hand as you unroll it.
  • Once it is laid, press it down firmly into the panel with your gloved hands to ensure it sticks down and does not float up.
  • Wait about an hour and then spread another coat of epoxy, This will be a flow coat. The goal is to fill the Kevlar weave. Spread the Flow coat as evenly as possible with a squeegee.

The 60" Fiberglass Mesh - Now it's time to lay down the full width layer of fiberglass cloth.


60" Fiberglass Cloth Step by Step
  • Lay down the 60"wide  layer of fiberglass over the entire panel, covering the just flow coated Kevlar. Smooth it out with your gloved hand or a squeegee as you unroll it.
  • Add another coat of epoxy, probably about 42 ounces, to completely wet out the glass. Use a squeegee to smooth the cloth and eliminate wrinkles and bubbles.

10" Strips of Fiberglass Cloth.

You will have a layer of Kevlar with a layer of Fiberglass laid down at this point, The Kevlar area will have two layers and the outside strips will have one layer of fiberglass. The next step will be adding a 10" strip of fiberglass over the single layer at the edges. This reinforces the 4 1/2" Plascore strips that were added to each side of the 4x8 sheets.

10" Strips Step by Step:
  • Lay the 12" strips of glass cloth on the edges.
  • Flow coat epoxy over the strips and smooth them out with a squeegee.
  • Once this is all done, place 3 mil plastic over all the joints in the Plascore sheets, (the dovetail joints and the side strips).
  • Then place plywood or boards over the joints and weight them heavily until the epoxy is cured overnight.

OK, One side is done. Next up the Other side.

Friday, August 29, 2014

Slip or Quick Release Indicators


One of the preferred tactics of many stillwater experts is the use of a slow almost painful retrieve especially when using chironomid patterns. This technique is often done "Naked", which is without and indicator. In order to fool the largest and most challenging fish you must sometimes retrieve the fly at a maddening creeping pace. This pace is often referred to as static. Sort of like watching paint dry.

When targeting greater depths, 10' to 20' many of these anglers have used indicators. The technique evolved using corkie indicators set to depth and fixed in place with a toothpick to enable the angler to present flies right on the bottom where they need to be. In the past toothpicks have been the most popular method of pegging the indicator to the appropriate depth. The only problem was that when a fish was hooked, the anglers risked loosing the fish by having to grab the line during the battle, using their teeth to remove the toothpick. The indicator slid free for the balance of the fight. With the newer evolution of "Slip" or "Quick Release" indicators, the battle of removing the toothpick is now over.

What has come to be the technique of choice for fishing water over 10 feet and up to 20 feet is the use of "Slip" or "Quick Release" Indicators. The Slip Indicator uses a concept so simple it makes you wonder "What took so long". The system uses an over sized peg that the leader is fed through and then pegged to the "Corkie" style indicator. The Slip Indicator system allows a fly fisher to fish deeper waters with confidence.

In actual practice, to rigg the indicator you thread the indicator and peg onto your leader, gather and pinch the leader and then push the leader against itself to create a loop of approximately 1" in diameter, just slightly shorter than the peg sticking out of the indicator. The peg wants to be pointed to the fly not the fly line. Push the peg with firmly but not too tight into the indicator.

When the strike comes, lift the rod and the tension between the angler and fish releases the loop and the indicator is free to slide. The cumbersome method of removing a tooth pick is gone.

Slip Indicator Tips

  • When fishing with slip indicators the technique is almost static. It is primarily "Heave it and Leave It".
  • If the choice is to move the indicator at all, use a pinch strip, holding your hands together and moving the indicator an inch at a time, very slowly.
  • You can use use a 6" to 12" strip with a steady and very slow motion.
  • OK, how slow is slow? When fishing indicators, imagine you are sitting on a keg of dynamite. When retrieving, if you see any ripple of water moving at the indicator or from the floating line, you blow yourself up. That slow!
  • When fishing leeches under indicator, try casting straight up wind and hand twist retrieve it as the wind pushes it back towards you. You are really just gathering line not trying to move the flies.
  • Use wind drifting to fish the indicator rigg.
(a) Anchor with fore and aft anchors parallel to the wind.
(b) Cast across wind at a 90 degree angle to your anchored position
(c) Let the wind move your indicator along with the wind
  • Remember insects can't swim against the wind they drift with the current.
  • Start with your flies 1' to 2' off the bottom. Then work up the water column until you find willing fish. 6" can make a difference especially with rainbow trout.
  • Focus on water that is less than 20' deep
How do you Determine Depth

How do you determine the depth of the water you're fishing in. You can get a rough idea from using your electronics, fish finder with a depth sounder, to get a ball park. But to get it right, you need to test the depth. Anchor your boat fore and aft and test the depth where you plan to fish.

(a) Set your indicator to the approximate depth as determined by your depth finder
(b) Attach weight to your point fly (bottom fly).
(c) You can attach your hemostats to the fly or a weighted sinker
(d) Lower the fly with the weight slowly until it gently hits the bottom.
(e) Check to see how far the indicator is under the surface of the water.
(f) This will be the depth of your point fly off the bottom when you remove the hemostats or weight.
(g) Adjust the indicator accordingly to the desired depth to be fished. You want to start at 1' to 2' off the bottom or the weeds.

Use "Balanced Flies"

Try using balanced flies. Tie up some balanced flies, like a "Balanced Leech". This style of tying incorporates a tungsten bead mounted on a common straight pin that extends from the hook shank in front of the eye. The tungsten beads work best as their dense mass maintains an overall compact fly. The horizontal balanced flies take on the natural path and profile of most aquatic food sources. Their pitching and jigging action is tough for fish to resist. Try tying up a balanced leech or scud and see how they work.

You can get tying instructions for "Balanced Leeches" at Phil Rowley's www.flycraftangling.com. His site is full of stillwater fishing tips and techniques. Check it out!

The "Balanced Leech" photo is courtesy of Fly Craft Angling.


How do you Rigg your Leader for Slip Indicators

  • Start with tying a stiff piece of 24" monofilament to the fly line with a nail knot.
  • Tie on a tapered leader, 9' to 15', 3x or 4x with a blood knot. If the budget allows fluorocarbon leaders are ideal. Especially when targeting water about 10' deep.
  • With the butt section and leader in place simply add fluorocarbon tippet to reach the overall finished leader length.
  • Add a swivel or tippet ring at the end of your extended tippet to insure you won't lose the peg from your indicator in the case of a break off.
  • Install the swivel 18" to 24" above the 1st fly.
  • You can tie a dropper right off the swivel or tippet ring.

How do you determine the length of the tippet?

A simple rule of thumb to follow is the overall leader length should be 25% longer than the water is deep. For example, working a chironomid pupa in 15 feet of water would require a 19-foot leader.

How to you Rigg the actual Slip Indicator

  • Slip indicators come in various sizes, colors and shapes. Carry many options.
  • The common denominator is that they all have a peg to fix the indicator in place.
  • This peg comes loose when a fish takes your fly and tightens the line. The peg and the indicator drops to a swivel or tippet ring placed above your flies.
  • Carry swivels and/or tippet rings to keep from losing your indicator and mainly the peg. The indicator would float to the surface if you broke off, the peg won't
  • When installing the indicator the peg faces the flies.
  • You can tie a dropper off the swivel or the tippet ring as an option.
  • Use a dropper tags to attach the droppers. Keep them shorter than 10".
  • Maintain a spacing of about 3 feet between your flies.


Casting Indicators

  • Keep casts short, 30' to 35' is ideal
  • Use a roll cast combined with roll cast pickup to recast your rigg.
  • Use small indicators to keep yourself honest and keep the indicators close enough (30' to 35".
  • When casting, open up your loops, break your wrist slightly. Apply smooth power. Don't punch your casts.
  • Make sure your backcasts lay out behind your completely.
  • Try integrating a "Belgian Cast".
  • Shoot your line to the target.
  • Watch for distinct plops of your indicator and the flies laying out to make sure you're not tangled.
Summary

Add "Slip" or "Quick Release" Indicators to your stillwater strategies and you will take your stillwater game to a new level.

You can purchase Phil Rowley's Slip Indicators at his website, www.flycraftangling.com

Thursday, August 28, 2014

Kingfisher Drift Boat Build - Laying Out and Cutting Out the Bottom

I glued my sheets of Plascore together yesterday, the epoxy is set up so the next step is to layout the bottom. use a flexible batten to draw the curves and then cut the bottom out.

Easy enough, Right?


I've purchased plans for the Kingfisher from Cajune Boats, Along with the plans came a handy layout for the bottom. It goes something like.

  • First draw a center-line down the length of the two Plascore sheets. I set a string line the whole length and then transferred marks onto the Plascore sheets and then used a straight edge to draw a pencil line down the center.
  • Once the center line was established I marked the sheets every 12 inches from one end to the other end. approximately 14'. I placed marks on both edges and used a straight edge to draw reference lines across the sheets perpendicular to the center line. 
  • Once these lines were drawn they were marked a,b,c,d, and so on.
  • The lines marked perpendicular to the center line will be the offset lines. A table was provided with the plans with the offset distances. These offsets are measured both ways from the center line.
  • I used a metal ruler to measure the offsets.
  • Once they were marked I placed finish nails through the Plascore and into the plywood table underneath. These will be the reference marks to draw the outline of the bottom.
  • I next selected a piece of straight grained 1x vertical grain Douglas Fir and ripped a batten that was approximately 1/4" thick. I used this to bend around the finish nails to draw the shape of the drift boat bottom.
  • The coordinates provided were close but needed to be fine tuned to get a fair curve.
  • Once one side was adjusted and laid out and the outside line was drawn, I transferred the adjusted offsets to the other side so each side was the same.
  • Once both sides were laid out all I had to do was cut it. 
  • I used a Skilsaw with a sharp carbide blade. I set the bevel of the saw to 25 degrees. I cut the line in a direction so the cut was the "Short Point" of the bevel on the top of the sheet.
  • I placed spacers under the Plascore to lift it off the table about 3/4". The depth of the blade was set about at about 7/8" deep.
  • How did it cut? I was hoping that the saw blade would not heat up the Plascore and make a melted mess. It didn't melt or burn in fact it cut like butter.

Construction Photos


This photo shows the 1/4" thick batten used to layout the curve at the rear of the bottom. 


This shows the finish nail on the reference mark with the batten lightly clamped in position. In the photo above you can see the clamps on at each coordinate of the layout.


Here is the bow section laid out


Next Up - Laying Down the Kevlar and Fiberglass on the bottom.


The Slate Drake and the Gray Drake Mayflies

There seems to be some debate as to what genus that the larger Gray or Slate colored mayflies we come across on the Lower Yuba really are. The concensus is that they are Drakes. Are they the genus Siphlonurus or are they the genus Isonychia? I'm not an entomologist so the best I can do is research.

According to the information in the book "Flyfishers Guide to Northern California" put together by Seth Norman, the chapter authored by our local Ralph Wood, states that they are Gray Drakes or Siphlonurus occidentalis.
Hogan Brown has remarked that there is a minor Isonychia hatch on the Lower Yuba of which he has created a pattern the "Isonychia Nymph" to match.

Dave Sloan who regularly guides on the Lower Yuba has also come up with a fly to match the Isonychia mayfly, Sloan's Bead Head Mighty May Hendrickson fly pattern He states that it is an extremely effective choice when imitating mature Hendrickson (or Isonychia) nymphs.

The Siphloeurus mayfly is commonly referred to as the "Gray Drake". The Isonychia mayflies are commonly referred to as the "Slate Drake".

When I looked up the Slate Drake or Isonychia mayfly on the "Trout Nut" he states " In the West, Isonychia hatches are not very important, and they may be attributed to several minor species, especially Isonychia Velma ".

Well for now I'll refer to them as the Gray Drake, until someone who knows more about this than me can confirm which mayfly or both are present on the Lower Yuba.

As far as matching the Drake that hatches on the Yuba and catching fish it probably doesn't matter that much. I'll provide the entomology on both. If anyone can shed some light on this please let me know.


The Gray Drake, "Siphlonurus" Mayfly


Gray Drake

Scientific Name: genus Siphlonurus

Common Names: Gray drake, black drake


Nymph Size: 12-20 mm (1/2 to 3/4 in)

Nymph Color: Grays

Spinner Size: 12-20 mm (1/2 to 3/4 in)

Spinner Color: Wing: clear. Body: dark gray, burgundy, yellow-olive; bottom lighter than top

Other Characteristics: Nymph: three fringed tails; large gills; antennae less than twice as long as the width of the head. Duns and spinners: two tails.
spinner

About Gray Drakes

Gray drakes are swimmer-type mayflies. They inhabit weedy sections of slow moving streams and some lakes. In rivers, the mature nymphs move near shore, then crawl out of the water to emerge. Hatches are in the summer through September.

Nymph imitations should be fished like a small streamer, retrieving the fly near the bottom in short strips of a few inches (pause between each strip).

Because the duns don't emerge in the water, they are seldom available to trout during a hatch. Spinners patterns are very useful, however, and the large size of the natural insect piques the interest of trout. Egg-laying occurs over slow, flat water, and that is where your spinner imitation should be cast; it can happen at almost any time of day. Unfortunately the spinner falls can be so massive that it's difficult to get a trout's attention or for you to distinguish your fly from the hundreds of naturals.


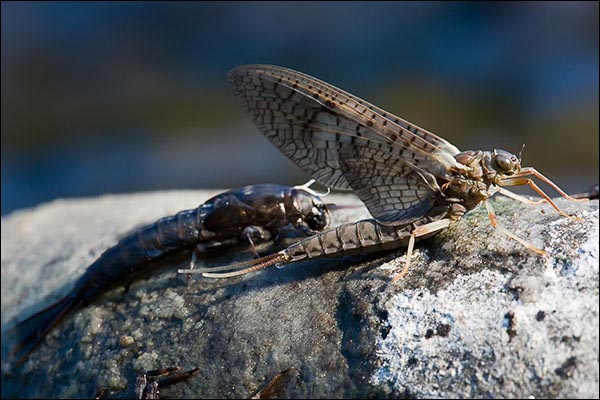
The Slate Drake, "Isonychia" Mayfly


Isonychia Dun

Scientific Name: genus Isonychia

Common Name: Isonychia, Heindrickson


Characteristics


Nymph Size: 13-19 mm (1/2 to 3/4 in)

Nymph Color: Black, dark red-brown

Dun Size: 13-19 mm (1/2 to 3/4 in)

Dun Color: Wing: dark gray with mottling. Body: gray, red-brown

Spinner Size: 13-19 mm (1/2 to 3/4 in)

Spinner Color: Wing: clear. Body: dark red-brown or gray

Other Characteristics: Nymphs: slender shape; long hairs on front legs; three fringed tails. Duns and spinners: two tails; large hind wings


About Isonychias

Isonychia mayflies are strong swimmers, and live in moderate to fast flows. They are not important everywhere; in fact, they are of no importance whatsoever on most rivers. But where they occur, they are often found in good numbers and can generate aggressive and selective feeding from trout. They hatch during the summer months.

Prior to emergence, the nymphs migrate to slower water. During the migration, many drifting in the flow and are taken by trout. This creates the most productive fly fishing opportunity: dead-drifting nymph imitations near the bottom.

Nymphs crawl out of the water and onto to dry land to emerge, so there is little point in fishing a dun imitation. However, spinner falls can be important.


Nymph.


Isonychia Nymph, another view


Isonychia Spinner


Isonychia Notes:

  • Use Hendrickson patterns that imitate the mature nymph life stage
  • Use an impressionistic searching fly or as a realistic imitation when matching the hatch
  • Hatches in eastern North America occur from spring (April) to early summer (June)
  • Nymphs are active throughout the day, making this nymph a fantastic searching pattern when the current hatch is unknown
  • Fish on a dead drift in medium to fast water
  • Use a high stick nymphing technique through really fast riffles
  • When targeting fish during a prolific hatch, cast upstream and drift through the main current
  • Hendrickson nymphs can work quite well during heavy Isonychia
  • When using the Hendrickson nymph to fish an Isonychia hatch, vary your presentation styles as these nymphs are quite mobile and could be anywhere within the river environment
  • Trout strike quickly and aggressively when feeding on Isonychia, so be prepared to set the hook
  • The typical nymph is size 14

Wednesday, August 27, 2014

Kingfisher Drift Boat Build - Plascore Bottom


Plascore Board

I'm using 3/4" Plascore Board for the bottom of the drift boat. It's sort of a honeycomb plastic sheet. There have been many pros and cons discussed on various boat building forums about plywood versus Plascore. The thing that swayed me in that direction was the fact if you hit a piece of rebar or took a hard hit on the bottom and punctured the Linex coating, the Kevlar and fiberglass, with a Plascore bottom you could do a temporary fix and then flip the boat over and do the real repair when you had time. Water migrating into the core won't damage a synthetic material like Plascore. A plywood bottom would keep sucking water like a sponge. Not good! Makes sense to me anyway.

Ordering the Plascore

One problem I had when ordering the material direct from Plascore was determining what specific type of board I needed. After a few emails back and forth with the Plascore Rep we figured it out.

Here's the exact specification from Plascore. I needed 2 sheets.

Specification: 5pcf PP core with film and veil at 3/4" thick X 48" X 96".

The material was shipped from Michigan and I picked it up in Sacramento. The 2 sheets ran $98 plus about $120 for the shipping. So basically about $110 a sheet to Sacramento. Michigan is a long ways away!

Constructing the Plascore Bottom


To construct the drift boat bottom out of plascore you first have to splice together the two 3/4" x 4' x 8' boards into one sheet that is about 4' x 15' 4". You do this by creating a sort of dovetail key joint and lock the two sheets together.


Dovetail Scarf Joints Laid Out on 2 - 4x8 Sheets of Plascore

  • I used the same table that I used when scarfing the plywood. It is 5' wide x 16' long and is about 34' off the floor.
  • The plans provided by Jason Cajune has a layout for the dovetail joints. I laid out the two sheets as per the cut sheet provided.
  • The joints are cut with a razor knife.
  • Once they are cut they have to be fine tuned a bit so they lock together tightly. They sort of snap together.
  • Once they are together place a 3 mil piece of plastic under the joint, A piece about 24" x 5' is about perfect. 

I've cut the dovetail joints with a utility knife


Here's the joint locked together


Adding 4 1/2" Strips to the Sides


The Plascore sheets are 48" wide and the drift boat bottom is about 57" wide. The sides need to get extended by adding strips to each side that are about 4 1/2" wide. 48" + 4 1/2" + 4 1/2" = 57" 

  • If you're building a squared off transom you can cut 4 strips 4 1/2" x 48" from one end of the Plascore sheet. The bottom for a square transom is about 14' long so you can cut 4 of them from the end.
  • I'm doing a curved transom which will require an addition 8" or so making the bottom length about 14' 8", so cutting all 4 pieces from the end will be cutting it too close. I'll cut 2 or maybe 3 from the end and 1 or 2 from the sides.
  • These 4 1/2"  pieces will be added to the middle section only based upon the bottom layout provided with the plans. They must be placed in the correct position.
  • Being that the added strips are so close to the sides they can be butted to the larger sheets. They will be covered with enough fiberglass from the side panel/ bottom panel joint for strength. 
  • Hold the strips in place with finish nails or tape.
  • Once all the pieces are laid out and in place put finish nails around the perimeter along the sides to keep the pieces from moving apart when using epoxy peanut butter to glue everything together.
  • Mix up a batch of epoxy peanut butter that is fairly smooth and fill the gaps in the key joints. It will probably take about 3 ounces. Concentrate on the larger gaps.
  • Place additional strips of 3 mil plastic over the areas with the epoxy peanut butter and then place plywood or boards on top of the plastic and weight to hold the sheets flat against the table.

4 1/2" Strips added to both sides


You can see the "Epoxy Peanut Butter" at the dovetail joints in this photo. You can also see it on the added 4 1/2" Strips.

I'll let this set up overnight, strip off the boards and plastic and get ready to cut the bottom shape.

Next Up Laying Out The Bottom and Cutting it Out


.

Tuesday, August 26, 2014

Double Anchoring Your Pontoon Boat


I had the unfortunate experience of fishing an Idaho Lake a few weeks ago when the wind started blowing and gusting like crazy. I was fishing in my pontoon boat and I was soon swinging and swaying with the wind. Trying to cast and present my flies where I wanted to was downright impossible. I essentially gave up. There were some other people fishing out of double anchored boats and they were fishing comfortably and having no problem at all. They were catching fish and I was trying to just stay in one place. Luckily the wind died down and I was able to continue fishing. I've learned my lesson.

My older "Water Skeeter" pontoon boat and most other pontoon boats come with a rear anchor system which is helpful with controlling stillwater presentations. Until the wind really starts blowing that is! I've found that whether you are fishing out of a pontoon boat, float tube or boat, line control during the retrieve is critical. When the wind starts blowing rear anchored pontoon boats spin and sway around the rear anchor, which really challenge your presentation control and for me, my patience.

To solve this problem I purchased a "Scotty" Anchor cleat with an additional rail mount accessory. By adding a second anchor cleat to the front frame of my pontoon boat, it has really helped the spinning and and swaying when the wind comes up. I had to fuzz with my rail mount a bit, but it works really well. I mounted my forward anchor on the left frame rail, just before the right angle turn for the foot peg. My theory was that as a right handed caster this placement keeps my fly line away from the anchor cleat. So far this has worked out well.
I am using a 5 lb. pyramid anchor that I had laying around and it seems to hold well enough. It definitely has kept the swaying around down. I've found that if I first set rear anchor I can then lower the front anchor and I'm good to go. My frustration with the wind has literally blown away. I can now concentrate on the fishing.

The sad part is that I'd already purchased the "Scotty" Anchor cleat before I'd gone fishing on that lake in Idaho, I just hadn't mounted it yet.

Lesson Learned!

Monday, August 25, 2014

Kingfisher Drift Boat Build - Flow Coating Epoxy

I've been working on the side panels for the "Kingfisher. The process so far has gone sort of like this;

Steps So Far

(1) Scarf the sheets together
(2) Cut out the side panels to the pattern or dimensions
(3) Sand the scarf joints flat with a 1/2 sheet sander or random orbital sander
(4) Sand the the outside of both sides panels with 100 grit, 120 grit and finish with 160 grit
(5) Vacuum of the surface of the exterior side panels
(6) Cut the fiberglass mesh to size,
(7) Use a dry brush to smooth out the flberglass mesh on the panels being careful not to stretch it too much
(8) Bed the fiberglass with epoxy using a squeegee and natural bristle brush
(9) Let the epoxy set until tacky like the sticky side of duct tape.
(10) Flow Coat epoxy over the fiberglass mesh to fill the epoxy pores.

So this is the stage I'm at. I'm going to back track a bit and talk about epoxying down the fiberglass mesh first. This process is a little bit like you have enough information to be dangerous. It's like you think you've got it all figured out and then you start and realize you're sort of winging it.

The fiberglass mesh is just laying on top of the side panels dry. The first coat of epoxy will be poured onto the fiberglass mesh. I mixed up about 12 ounces of epoxy to start spreading it with a squeegee and that went pretty smoothly. Spreading it with a squeegee was pretty intuitive. You spread it from the center towards the sides and edges, smoothing it as you go and being careful not to stretch out the fiberglass mesh. They call it a "modified waitress wiping motion". When I got done the only problem I had is that I had some wrinkles at the edges and a few small, quarter sized areas where the glass floated up. I think this is par for course.

I then waited until the sheet tacked up and then did the first flow coat. This second coat of epoxy essentially fills the rest of the fiberglass mesh so you can then sand it once it dries without digging into the glass. I mixed up a batch of epoxy about 9 ounces and got started.

Flow Coating

  • Mix up about 9 to 12 ounces of epoxy. Mix it for 2 to 3 minutes.
  • Get your epoxy pallet ready, I like plastic plates on top of a scrap piece of plywood.
  • Get your tools, 3/16" nap foam roller and a 2" disposable bristle brush
  • Pour some epoxy down the center line of the sheet
  • Use the foam roller to spread the epoxy around until it is a thin even coating. 
  • Work an area and then use the 2" disposable brush to even out the epoxy.You do this by "tipping", just use the tip of the brush in light strokes moving in one direction,towards the direction of which you are applying the epoxy.
  • Spread the batch of epoxy and then mix another batch and keep going.
  • Keep a wet edge.
Next I'll let it dry overnight. This second Flow Coat eliminates sanding between the first and second coats.

Flo Coating the 3rd and 4th Coats

I chose to let the 2nd coat dry and harden overnight. This allowed me to sand the surface and get some of the imperfections taken care of before I got too far along. The outside of my Kingfisher will be painted but I want a real smooth finish so I want to take extra care with this process. The top edge of the side panels will be covered with a 1 3/8" gunwale. The bottom edge will be covered with about 4" of truck bed liner. So the middle sections of the panels are the critical areas. With that said I'm still going to try to get them as perfect as I can.

The next day I sanded the two exterior side panels with a random orbital sander. I used a 5" random orbital sander with 80 grit paper. I got my two fans running but on my respirator and got after it. I sanded down to the fiberglass in a number of areas but really tried not to go too far. The fiberglass is what gives the panel it's strength. It went pretty quick but I went through about 8 sanding disks. This is normal. If it isn't cutting change the paper. 

I talked to the guys at Raka Epoxy about the next step. The epoxy I'm using is their non-blushing type. So all I needed to do was vacuum the panels and then wipe them down with Acetone. You can also use Denatured Alcohol.  The Acetone cleans the panels and evaporates quickly.

I put on my Tyvek Clown Suit, rubber gloves, glasses, mask and got after it. Same process as listed above. I did one flow coat and waited about 4 hours and did the fourth coat. Looks pretty darn good. I'll wait until tomorrow and then take a photo. Then I can flip the two sides over and give the insides  two flow coats. They won't be fiber-glassed.

Kingfisher Drift Boat Build - Modeling Transom

I'm cutting out the sides and bottom for the "Kingfisher" drift boat and I'm sort of wondering how do these parts come together to look like a drift boat? The bottom looks like a drift boat bottom, but the sides look like long rectangles.

I've also got to decide on whether to build the transom as a  (a) "Square Transom" like the plans I've got, or whether to experiment and build either a (b) "Rounded Transom" or a (c) "Beavertail Transom". The "Beavertail" is how my "Hyde" drift boat is built. I like it a lot.

I've built models of the "Rounded Transom" and the "Beavertail Transom". I've shot a video to take a closer look at it.


I think I like the "Rounded Transom". Now I just have to figure out how the heck to build it.

Sunday, August 24, 2014

Finally Back on the Yuba

This summer has been quite a whirlwind. Laura, Zack and I toured Italy for a little over 3 weeks, seeing parts of Sicily, the Umbria region and of course Rome. We ate our way through the countryside. We got home and about a week later headed to just north of Coeur d' Alene, Idaho and stayed two weeks at Hayden Lake. The fishing was slow because of warm temperatures but I we managed to catch, smallmouth bass, pike, crappie, triploid rainbows and perch. A little of everything. I also fished the Coeur' d' Alene River a couple of times for cutthroats. That was a kick. Lot's of smaller fish and once in a while a bigger one.


There were a bunch of Cutts in this size class

I also drove up into the headwaters of the Coeur d' Alene River one day and drove along a US Forestry Road just stopping and fishing as I went along. There were cooperative fish pretty much wherever I stopped. I mainly used an EC Caddis or a smaller Fat Albert. They weren't to picky.

Headwaters of the Coeur d' Alene River

On the way home I stopped at The Red Barn Fly Shop on the Stillwater River and met "Poppy". This flyshop is a mecca for Spey fishers. It looks like a remodeled chicken coop but it it stuffed with gear. "Poppy" made me feel right at home.


The Red Shed


Poppy


Ton's of Spey Fly Tying Materials


Every kind of Spey Rods and Spey Lines


Lots of Spey Flies

So I finally made it back out on the Yuba with Mike Williams, we battled the Delta Wind with pretty severe gusts but we managed a few fish. As usual for me it's about getting out and enjoying the river and the day.


Kingfisher Drift Boat Build - Fiberglassing the Side Panels

Well, today's the day to start prepping for fiberglass and that means sanding the panels. I've got a good dust mask, fans blowing and my fine dust filter system running. The sanding part of boat building is something you better be ready for because there' a whole lot of it.

From the advise of Jason Cajune's instruction manual, I'm going to glass the side panels now while the panels can be laid flay on the work table. He advises that it is cleaner and easier and the glass job turns out better.


Things to Gather Up and Organize


  • 5" Random Orbital Sander - Check!
  • 5" Sanding Discs. 100, 120, 150 grit -  Check!
  • Vacuum - Check
  • A 17' x 60" piece of 6 ounce fiberglass cloth for the two side panels - Check!
  • Epoxy, about 120 ounces. Check!
  • Squeegee - Check!
  • Foam Roller - Check
  • Scissors - Check!
  • Random Orbital Sander!
Preping the Panels

Since I've built a table that is 5' wide and 16 foot long I'll be able to do both panels at once. For the Kingfisher only the outside of the side panels will be glassed. 
  • One of the panels will have to be helicoptered around so the two outside faces of the side panels will be mirror images. Bottom to the bottom or top to the top. The two bow profiles should be on one end together.
  • I'll need to separate the panels by about 1".
  • I'll need to make a final inspection of the scarf joints. If they are bumpy a good thing to do is to take a piece of plywood about 1/2" x 4" x 12" and glue some 80 grit sandpaper to it. Smooth out the joint by sanding back and forth across it. In my case I'm going to paint the exterior of the boat. Since we are working on the outside panels I can sand through the finish veneer if necessary to get the joint flat. This is very important as this scarf joint will remain a hard point in the hull when it is painted if you don't get it perfectly flat. I'll need to really take my time. I'll need to work my way done to 150 grit.
  • If during the sanding process the feather edges get broken off I'll have to fill them with Epoxy peanut butter and then re-sand.
  • Once the scarf joints are perfect, I'll need to sand the panel down to 150 grit.  
  • I'll blow off the sanding dust with compressed air and then vacuum them.
Time to Fiberglass

Now its time to roll out the six ounce fiberglass cloth.
  • Lay the 5' wide fiberglass sheet across the top of both sheets. Roll it out so it covers both panels.
  • With a sharp razor knife or scissors I'll cut the glass down the middle between the two sheets.
  • I'll then smooth out all the wrinkles using my hands
  • Start by mixing 30 ounces of epoxy. That will be 20 ounces of resin and 10 ounces of hardener. Apparently you can use a kitchen mixer paddle attached to a drill to help mix the epoxy. This should be done at slow speed. I'll do the final mix by with a stir stick.
  • Start by pouring half of the epoxy on each of the two panels ( half on one panel and half on the other). I'll leave the mixing bucket upside down  to drain on one end.
  • I'll start in the middle of one of the panels and use the squeegee to spread the epoxy back and forth across the glass working it into the weave of the fiberglass. I'll try not to stretch the fiberglass.
  • I'll spread the epoxy across the plywood from the center to the edges and not the long axis. Sprading it in the long axis may stretch the glass too much. This can cause bubbles.
  • A tip is to take your time and take care not to dump any epoxy goo off the edges.
  • The epoxy will start to make the glass clear and it will be easy to see when the glass is getting saturated. 
  • It is important to carefully work the epoxy goo out to the edges.
  • If bubbles start to develop, work from the middle to the edge and pull the bubbles out with the squeegee. 
  • The motion is referred to as a "Modified Waitress Motion".  Use this motion until all the epoxy is evenly worked into each panel. 
  • If necessary mix up more epoxy to saturate any dry spots.
Tip - Don't over do the Epoxy!
  • If the glass seems to be floating on a puddle of epoxy this is bad. Squeegee some of it to other areas. The first coat of epoxy is meant to adhere the glass to the plywood and just partially fill the weave of the fiberglass cloth. 
Decision Time - Flow Coat or Call it a Day

At this point a decision needs to be made, I can (1) do a "flow coat" of epoxy over the glass or (2) leave it overnight. The advantage of doing a "flow coat" is that it eliminates having to sand the panels after they have dried. Once the panels have dried you must sand them prior to applying another coat of epoxy.

If the decision is to "flow coat" them the panels must sit for an hour or so and when they get tacky to the touch the "flow coat can be applied.

How to "Flow Coat"

Things I'll need

  • Epoxy
  • 1/8" foam roller
  • Natural Bristle Brush or Foam Brush
How to;
  • The tack coat with the fiberglass needs to tack up a bit. It should stick a bot to your glove when touched.
  • When ready mix up about 8 oz. of epoxy and when mixed pour it onto the panel and use the 1/8" nap foam roller to spread it. 
  • Spread it thoroughly as you don't want it to be thick.
  • When spread "tip it" with the brush to flatten out the roller marks an get the epoxy to lay down smoothly.
  • Mix more epoxy and repeat until both panels are covered


Saturday, August 23, 2014

10 Tips for Stillwater Success


Becoming a knowledgeable and proficient fly fisher on stillwater lakes means spending the time to learn how these ecosystems function. This includes;

  • Learning the structure of the lake
  • What food sources are present
  • The preferred habitat of the trout and other game fish species
  • Knowing the best times of the year to catch these fish.
Lakes are much more mysterious in offering hints as to where the trout are going to be found as compared to rivers and streams. In rivers and streams there are currents to dictate where fish can live or that determine prime aquatic invertebrate habitat. For these and other reasons, many fly fishers lack the confidence when fishing lakes and many times just never even get started.

Understanding lakes can be like a riddle, where we solve small portions of the riddle and eventually have the complete picture. Here are 10 tips, from Brian Chan, a professional fisheries biologist, to help solve the riddles of productive stillwaters found anywhere and will give you the tools to be successful. You can find many more articles of his at www.chironomid.com

Tip #1 - Know Where the Trout Live

Know the zones!

Lakes can be broken down into 3 distinct areas or habitat zones. The shoal or littoral zone is the shallow water area of the lake, the water from the shoreline out to about the 25 ft depth zone. This also coincides with the depth of maximum sunlight penetration which is a key factor in determining overall lake productivity.

  • Habitat Zone #1 - The shoal is where the vegetation grows and where the majority of aquatic food sources are found. The shoal is the grocery store and the trout come onto the shoal for food. It is the most important area of the lake when it comes to catching trout.
  • Habitat Zone #2 - The drop-off zone is where the edge of the shoal zone transitions to the deeper parts of the lake. The slope of the drop-off can be gradual or quite steep. Drop-offs are also the maximum point of green plant growth so are also a perfect fish feeding area as well as offering refuge from the warmer shallow waters during the hot summer months. This habitat zone is relatively short or narrow as the water quickly deepens to the deep-water zone of a water body.
  • Habitat Zone #3 - The deep-water zone supports the least amount of macro invertebrate (insects and other larger food sources) habitat. However, in many lakes the deep-water or mid-lake zone supports fairly prolific chironomid populations and subsequent emergences.

Tip #2 - Watch the Birds

Aquatic insect hatches can often be confined to certain shoals or specific locations within a lake. Often, on larger water bodies, a certain color chironomid can be emerging in one bay and a totally different size and color pupa emerging in another bay. Birds, such as swallows, terns, gulls, and night hawks, find emerging chironomids, mayflies, caddisflies as well as other hatching insects much more quickly that we can. Binoculars are valuable in seeing bird activity and especially when fishing larger lakes.

Tip #3 - Look On and Into the Water

Carry a small aquarium net to capture pupae, nymphs, emergers and adult insects so you can match fly patterns to size and color. Place the specimens in a vial or white dish to get a better idea of color and to watch the actual emergence process. Surface and sub-surface feeding trout leave distinct riseforms that provide clues to the angler as to what insect stage they are selecting. Trout feeding on minnows often show chasing/slashing rises as they work through the school of baitfish. And finally, polarized sunglasses allow you to see better beneath the surface to spot shoals, drop-offs, spring areas, and bugs.

Tip #4 -Know Your Insects and Other Food Sources


Learn to recognize the major aquatic invertebrate food sources that make up a large percentage of the diet of trout in many stillwaters such as;
  • Chironomids (midges),
  • Mayflies
  • Caddisflies
  • Damselflies
  • Dragonflies
  • Waterboatman
  • Backswimmers
  • Scuds
  • Leeches
  • Snails
  • Forage fish.
Equally important, have a sound understanding of their individual life cycles and habitat requirements. Getting to know a particular lake or group of lakes translates into learning which food sources are present and knowing the emergence sequences peculiar to those individual waters. Many good reference books cover identification, life history and distribution of the most common stillwater invertebrates. These insects' life cycles and emergence patterns are similar regardless of where a lake is geographically located.

Tip #5 - Water Temperature

Water temperature influences the hatches, and each insect order has preferred temperature ranges for development and emergence. Insect hatches follow a seasonal sequence that typically begins with midges, followed by mayflies, then damselflies, caddisflies and lastly dragonflies. The most intense emergences typically occur when surface water temperatures range between 50° F and 65° F. It is possible to see multiple insect orders and species emerging at the same time which can be confusing to both angler and fish. Anglers must rely on their knowledge of individual insect emergence strategies and be prepared to present all options to those feeding fish.


Tip #6 - Carry a Basic Selection of Fly lines

Stillwater anglers should be prepared to present flies from the surface to depths of over 40 feet. An understanding of individual insect order life cycles will dictate what depth zones may be fished when that particular food source is emerging or is readily available. Floating fly lines cover the shoal zone, water between 2 to 20 feet in depth, and are ideal for presenting floating, emerging, pupal, and nymphal imitations. A slow or intermediate sinking is a good line for fishing the deeper parts of the shoal such as water between 10 and 20 feet deep. This line allows slow presentation of pupal and nymphal patterns while ascending at a gradual angle towards the surface. A fast or extra fast sinking line provides good coverage of the 20 to 40 foot depth range and is useful for fishing dragonfly nymphs, leeches and shrimp along the deeper edges of drop-offs or retrieving flies up the face of the drop-off.


Tip # 7 - Fly Selections


Do some homework to learn what insects and other food sources are in the stillwaters you will be fishing. Local fly shops, fly fishing clubs, and regional fishing guidebooks are good sources for this information. The ideal fly box will have both generic imitations of food sources plus some refined patterns that more closely imitate the various life stages of insects found specifically in those waters. There are many good commercially tied fly patterns covering all the important food sources of trout and char in lakes. It is no longer a disadvantage to not being a fly tier. Basic sub-surface patterns that should be in your stillwater fly box include:

  • Leeches in black, maroon and dark green and with and without beadheads
  • Dragonfly and damselfly nymphs in light and dark olive body colors
  • Shrimp or scud patterns in light olive to dark olive
  • Mayfly nymphs in dark brown to tan
  • Caddis pupae in medium green to brown body colours
  • Chironomid pupa: chironomid pupal pattern colours include black, brown, green and maroon with abdominal ribbings of copper, red-copper, silver or gold wire
  • Dry flies to imitate the adult caddis, adult mayflies, and the adult chironomid

Tip #8 - Proper Boat Setup

  • Flat Bottom Boat or Pram - A stable flat-bottomed boat or pram is often the most effective way to fish the smaller trout lakes. The biggest advantage to a hard-bottomed craft is that one can stand up and look out over and into the water. This is a particular advantage when fishing clear water lakes as individual fish or schools of fish can be spotted and observed as to feeding behaviour and movement patterns.
  • Pontoon Boats - Pontoon boats are another good choice as the angler sits high enough in these craft to see into the water. Some pontoon boat manufacturers are now offering standing platforms. Both boats and pontoon boats can be moved from area to area much faster than a float tube. This can be critical when trying to locate specific insect emergences when fishing a larger water body. Hatches can occur at one end or bay of a lake and be non-existent in another location.
  • Depth Sounder or Fish Finder - Another essential tool for the stillwater fly fisher is a depth sounder or fish finder. We need to know the depth we are fishing so that flies can be presented in the right depth zone. Depth sounders are relatively inexpensive yet highly sensitive instruments. Things to look for in a sounder include the transducer cone angle which should be at least 50° wide or wider. This allows greater coverage of the bottom structure under the boat and thus increases the chance of marking fish. Remember the majority of fly fishing done in productive lakes is in water less than about 8 meters in depth and often in less than 5 meters. Consider the power source of the sounder as some units can go through smaller sized batteries at a very fast rate. Many sounder units come wired to run off a large 12-volt battery such as the one used to power your electric motor.
  • Noise Suppression - Fishing out of a boat can be noisy, particularly if it is made out of aluminum. Reduce the chances of scaring fish by fitting outdoor carpeting over the floor of the boat. Always keep in mind sound travels fast in water and trout have sensitive hearing systems.


Tip # 9 - Double Anchoring

When fishing out of a boat it is critical to have anchors out both bow and stern. This is especially important if there are 2 people fishing out of the same craft. Double anchoring prevents the boat from swinging back and forth when the wind is constantly changing direction. A stationary boat allows the best control of fly lines and retrieves. It is important to have as straight a line connection between the fly rod, fly line, leader and fly as possible so that even the softest bite can be detected. Simple anchor control pulley systems make lifting, storing and re-setting anchors easy while at the same time requiring little movement within the boat.


Tip #10 - Learn about Preferred Food Sources

Trout that become focused on a few dominant food sources in a lake can often become difficult to catch. Small nutrient rich lakes often support immense chironomid and scud populations. Anglers that have consistent success in these waters have learned the details of the life cycles and habitat preferences of these preferred food sources. For instance, when chironomid pupae suspend just inches off the lake bottom, often for several days, as they complete the transition from the larval to pupal stage, there can be great fishing even though there is no sign of any emergence at the surface.

When searching out a new lake, slowly troll or drift and cast around the basin while getting a good look at shoals, drop-offs, weed beds and perhaps sunken islands. Dragonfly nymphs and leeches are always good searching patterns. Both invertebrates are common inhabitants of lakes and both are big food items. Don't be afraid to try flashy or bright patterns like bead headed woolly buggers and be prepared to vary speed and direction frequently when either trolling or retrieving a cast fly.

Credits
These tips have been taken from articles written by "Brian Chan" a professional fisheries biologist. You can find lots of stillwater essays and tips at the website www.chironomid.com

Thursday, August 21, 2014

Kingfisher Drift Boat Build - Cutting The Side Panels

Now that I've got my big panel glued together,3/8" x 4' x 18', it's time to cut the side panels. I've got a layout provided with the plans that I've purchased from Jason Cajune. It's got the exact cut-out dimensions.

First order of business is to sand down the joints in the sheet where they were scarfed together.I cleaned up the two scarf joints, by first removing the clear package tape that I placed along side the joints. This saves a bunch of sanding. (See the photo below). Once I removed the package tape, I sanded the joints with 100 grit sandpaper with my random orbital sander. Using the random orbital let's you sand it down carefully. The finish veneers on the Okoume plywood are pretty thin.

Once that's done. I'll lay out the two side panels next

Laying Out the Side Panels


I've laid out the full length axis of the top of the sides. These are long bias lines. You get two sides out of the 4' x 18' sheet. I've placed a saw kerf in the edge of the plywood on my mark and another on the far end. I'll stretch a string line the whole length. I'll mark my line to the string line and then draw the line with a pencil and a long straight edge. Once it's drawn I'll set my skill saw to a fuzz deeper than the 3/8" thick plywood and cut the full length of the 18' long sheet. This will be two long bias cuts, one for each side panel. At this point I'm just cutting the long bias lines and not the transom line or the stem (bow). They will be cut out once the side panels are glassed.

I'll will mark out the stem (bow) and the transom.  I'm probably going to use a rounded transom so I'll have to modify the design to accomplish that.


Here's my cut sheet with my string line set.


Here's a shot of the string line set the full length of the 18' sheet


I've cut the two side panels.

Once I got the panels cut it's time to flip them over and clean up the scarf joints on the other side. You can see the package tape and the epoxy that has set up on the bottom side.


Once you pull the tape off, a bunch of the epoxy comes with it. This eliminates a bunch of sanding. The photo below shows how much is left once you pull the package tape. There's a little blled under the tape but it's real thin and easy to sand. I'm going to let this harden a bit more and then sand it tomorrow. I'll sand both sides of the panels with 100 grit, then 120 grit and finally work down to 150 grit.


Next Up - Fiberglassing the Side Panels

Wednesday, August 20, 2014

Kingfisher Drift Boat Building - Gluing the Scarf Joints

Now that I've got the scarfs shaped on the 3/8" x 4' x 8' Okoume Plywood for the sides I've got to glue them together with epoxy. First I'll have to gather up everything I need. Epoxy will be going off and I don't want to be looking around for stuff as it does. I've enlisted the help of my fishing buddy Mike Williams to help flip and place the sheets so I don't damage the feather ends of the scarfs.

I've got my epoxy stuff laid out and ready to get started.

What will I need, Let's see:
  • The sheets laid up out and ready to go. Check!
  • My epoxy and hardener. Raka Resin #127 - (Part A)- Low Viscosity and #350 Non-Blush Hardener (Part B) - Check!
  • Epoxy pump type dispensers (2) - Check!
  • Wood flour to make Epoxy Peanut Butter - Check!
  • Tongue Depressor type of sticks
  • Disposable Bristle Brushes
  • Plastic plates for the epoxy. Check!
  • An epoxy pallet. A scarp piece of plywood to mix and carry the epoxy around. Check!
  • 2 - straight flat pieces of 1x8 at least 4 foot long to clamp the joints together. (For two scarf joints). Check!
  • 3 mil plastic cut into 12" wide strips for under the scarfs and boards for clamping. Check.
  • Hammer and 1" finish nails. Check!
  • Clamps
  • 8 plastic buckets and enough sand to fill them.!
Got everything and it's laid out ready to go.

Time to get'er done! More prep work.

  • I'm going to glue the scarfs together on my table. It's stout and flat. I'm scarfing two 4x8 sheets together and adding one more 2' long sheet at one end to make a sheet that is 3/8" thick x 4' wide by about 18' long. This means I'm gluing two scarfs together so I'll have to work efficiently.
  • I've decided to do each scarf separately, so I'll join the 2 - 4x8 sheets first and then do the 4' wide x 2 foot long piece after the first is clamped and weighted down.
  • The 3 mil plastic needs to be stapled down so it doesn't get sucked into the glued scarf joint. I almost forgot this.
  • I've got one sheet on the table with the scarf facing up. (Bevel up)
  • I've got the second sheet lying flat on another portion of the table. It's much easier getting a consistent spread of the Peanut Butter Epoxy when it is laying flat.the table ready to lay down on top of the one laying on the table.

Time to get started with Mixing the Epoxy.

  • I'll start by mixing 3oz. of clear epoxy and apply it with a brush to the faces of the scarfs. It will soak in so I'll have to apply some more after a few minutes.
  • The Raka Epoxy I'm using has a formula of 2 parts of resin to 1 part hardener. This is where the pumps really are nice. Once the pumps are primed you just use the ratio of 2 pumps (shots) of resin to 1 pump (shot) of hardener. Doing a total of the three pumps mixes just under 3 oz.
  • I've brushed the clear epoxy on the two mating faces and then re-coated them one more time.
  • Once this is done I'll mix another 3 oz. of epoxy and add wood flour until the consistency is like "Creamy Peanut Butter". Smooth. Mix the resin and hardener before you add the wood flour. The epoxy should just barely sag and drop off the mixing stick when you hold it up. Add the wood flour slowly and mix thoroughly. It will become obvious when you get close to enough.
  • Apply the Peanut Butter Epoxy using the mixing stick as a spreader to the scarf on the table. It should be applied as evenly as possible. Once the peanut butter is applied to the scarf I am using an 1/8" notched spreader to make sure the epoxy is spread evenly. The entire scarf must be covered. It doesn't have to be super thick on the scarfs, just a light coating that will be compress and squeeze out when the joint is together.
  • Next I'll apply the same peanut butter on the joining piece that is laying on the table. It will have to be flipped over to join the two pieces together at the scarf.
  • Next I'll flip the panel that that joins to the 1st sheet and lay it on top of the panel on the table, carefully aligning the sides. Then I'll line up the scarf joint. It should lay down and match the two surfaces perfectly.
  • Check the alignment on the sides and press down on the scarf to see how it looks.
  • If and when the side panels are straight and the scarf is lined up as straight as possible, place a 1" finish nail about two inches in from the edge right through the middle of the scarf. Place another 1" finish nail on the far side of the scarf (the opposite side). This is to keep the scarfs in place.
  • Now run a screw through each panel into the table so that the panels do not accidentally move.
  • Now press the scarf together further and force out any excess goo. Wipe the excess off with a mixing stick. You must have squeeze out. If not take the joint apart and add more epoxy peanut butter.
  • Once the scarf is pressed together and the excess goo is wiped off, fill in any voids with the excess goo with a mixing stick.
  • Lay down another sheet of 3 mil plastic on top of the scarfs and put a straight 1x8 on top.
  • Put as much weight as possible on top of the 2x8. Buckets of sand work great. I used 5 gallon buckets filled with nails.
  • Apply clamps to each end.
Here's the first scarf done on the two 4x8 sheets.
  • Once this is done I'll repeat the whole process for the 4' wide x 2' long piece.
Here's the scarf where I've added the 4' wide x 2' long piece on the end.
  • Let the goo dry over night. Can't wait to check out the joints tomorrow!
Last but not least. Clean up everything and get ready for sanding the next day.

Next Up - Cutting the Side Panels